Use this file to discover all available pages before exploring further.
The new docs.trellix.com features a modernized UI and AI-powered conversational search. Content is currently available in English, with additional languages expected in early November 2026. We hope you enjoy the updated experience.
This page can be used to customize the policies as well as to configure the inspection options at the interface level. Inbound refers to any traffic destined for the internal network from an external source. Outbound refers to any traffic that originated from your internal network.
Note
Each window has either a
Save or a
Cancel button. Clicking
Save saves the information to the database and closes all policy configuration actions. Clicking
Cancel ends any operation and closes the window. If you want to continue creating or modifying a policy, do not click
Save until you have completed every tab, step, or action available in the window.
Task
In the Manager, click
Policy and select the required
Domain.
The
Inspection Options page is displayed.
Inspection Options Policies page
The following are the available default inspection options policies:
Default Client Inspection — To inspect traffic from internal endpoints as they access the Internet
Default Server Inspection — To inspect traffic to exposed Web and mail servers
Default Client and Server Inspection — To inspect traffic both from internal endpoints and to exposed Web and mail servers
Click
.
The
New Policy window opens with the
Properties tab selected.
Update the following fields:
Option
Definition
Name
Enter a unique name to easily identify the policy.
Description
Describe the policy for other users to identify its purpose.
Owner
Displays the admin domain to which the policy belongs
Visibility
When selected, makes the policy available to the corresponding child admin domains. However, the policy cannot be edited or deleted from the child admin domains.
From the drop-down list, select the option for the visibility level of the rule object.
Available options are
Owner and child domains and
Owner domain only.
Editable here
The status
Yes indicates that the policy is owned by the current admin domain. This field is uneditable.
Statistics
Lasted Updated
Displays the time stamp when the policy was last modified. This field is uneditable.
Last Updated By
Displays the user who last modified the policy. This field is uneditable.
Assignments
Indicates the number of inline ports to which the policy is assigned
Prompt for assignment after save
If you deselect this option you can save the policy now and assign it to the Sensor resources as explained in the following section. If you select this option, the
Assignments window opens automatically when you save the policy and you can assign the policy to the required Sensor resources.
Cancel
Reverts to the last saved configuration
Click
Next.
The
Inspection Options tab is displayed. By default, the
Traffic Inspection tab within the
Inspection Options tab is displayed.
Traffic Inspection
Option
Definition
HTTP Response Traffic Scanning
Enabling this option instructs the Sensor to inspect HTTP response headers and payload for attacks.
The
HTTP Response Traffic Scanning option is disabled by default because scanning response traffic requires extra system resources. To minimize the impact on performance, we recommend enabling this option only where necessary.
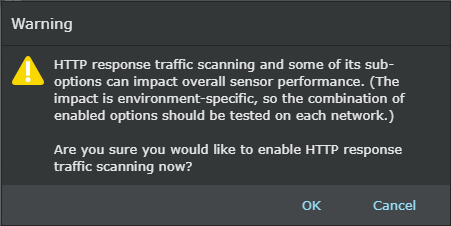
When you enable the HTTP Response Traffic Scanning option a warning message is displayed.
HTTP Response Decompression
HTTP response traffic is commonly compressed in gzip format to improve performance. This format reduces transfer time and bandwidth consumption. However, attackers use it to evade detection of malicious payload. Enabling this option instructs the Sensor to decompress compressed HTTP response traffic for inspection.
Note
The
HTTP Response Decompression option is disabled if the
HTTP Response Traffic Scanning option is selected as disabled.
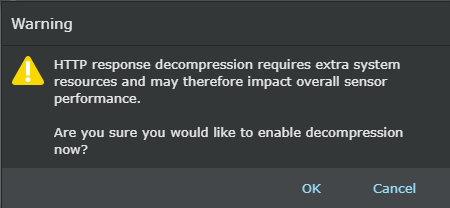
When you enable the HTTP Response Decompression option a warning message is displayed. Review the warning message and click
OK
to proceed.
Note the following if you use this option:
HTTP response decompression is supported for gzip compressed files only.
Advanced malware inspection of decompressed files is not supported.
This feature is not supported on M-series Sensors.
Chunked HTTP Response Decoding
Chunked transfer encoding is a data transfer mechanism of HTTP. The web server breaks the HTTP response content into chunks. Chunked transfer encoding uses the HTTP response header in place of the content-length header, which the protocol would otherwise require.
Enabling this option instructs the IPS Sensor to decode chunked HTTP response traffic for inspection.
Note
Chunked HTTP Response Decoding field is disabled if the
HTTP Response Traffic Scanning field option is selected as disabled.
HTML-Encoded HTTP Response Decoding
HTTP response traffic can be sent using HTML encoding, and attackers can use this encoding mechanism to evade detection of malicious payload. Enable this for the Sensor to decode such traffic for inspection. Some of the encoding techniques used are:
Deflate — This compression technique is used mainly to compress data in PDF file formats. PDF documents support using “deflate” encoding in parts of the document.
HTML encoding — The HTML response data is encoded using the "&#" encoding technique. The encoding can be in decimal or hexadecimal format.
Base64 — Base64 encoding is used to encode binary data that is to be stored and transferred over media that are designed to deal with textual data. This encoding technique ensures that the data remains intact without modification during transport.
Enabling this option instructs the IPS Sensor to decode HTML-encoded HTTP response traffic for inspection.
Note
HTML-Encoded HTTP Response Decoding is disabled when Response Scanning is disabled.
Microsoft Office Deep File Inspection
Microsoft Office version 2007 and later uses Office Open XML format, a zipped XML based file format. The zipped file contains multiple files upon extraction. Enabling this option instructs the Sensor to decompress compressed Office files for inspection.
Note
MS Office Deep File Inspection field is disabled if the
HTTP Response Traffic Scanning field option is selected as disabled.
When you enable the
MS Office Deep File Inspection option a warning message is displayed. Review the warning message and click
OK
to proceed.
Enabling this option allows the Manager to indicate when a connection has been proxied and report both the proxy server IP address and the true endpoint IP address.
Base64 SMTP Decoding
Enabling this option instructs the IPS Sensor to decode Base64-encoded SMTP for inspection.
Quoted-Printable SMTP Decoding
The SMTP protocol specification uses MIME content transfer encoding to transport binary data. Since SMTP protocol can handle only 7-bit ASCII data, each 3-byte group of binary data is converted to 6-bit number and replaced with an ASCII character.
Quoted-printable and Base64 are the two basic MIME content transfer encodings. Quoted-printable encoding uses printable ASCII characters, such as alphanumeric and the equals sign (=), to transmit 8-bit data over a 7-bit data path.
Enabling this option instructs the IPS Sensor to decode quoted-printable encoded SMTP for inspection.
MS RPC/SMB Fragment Reassembly
SMB is a network file sharing protocol. MS-RPC provides a framework for interprocess communication mechanism to exchange data between two processes residing on the same system or on two remote systems accessible over a network. MS-RPC's transport layer could be TCP, UDP, HTTP, or SMB. SMB protocol supports segmentation of its data.
Also, MS-RPC protocol supports fragmentation of its payload. Since MS-RPC can be carried within SMB protocol data, either fragmentation or segmentation or a combination of both can be used to evade any network packet inspection device.
Enabling this option instructs the IPS Sensor to reassemble MS RPC/SMB fragments for inspection.
Layer 7 Data Collection
Enabling this option instructs the Sensor to include Layer 7 information, such as HTTP URLs, SMTP email addresses, and FTP logon names, in alerts and to export them to NTBA appliances for analysis. The following options are available in this field:
Disabled
Inbound Only
Outbound Only
Inbound and Outbound Only
By default, the option
Disabled is selected.
Passive Device Profiling
Enabling this option instructs the Sensor to parse DHCP, TCP, and HTTP packets to identify the device type and operating system, and to make that information available for display for attack relevance analysis.
Simulated Blocking
Enabling this option instructs the Sensor to merely simulate blocking, sending a TCP reset, and ICMP host unreachable message. Simulation applies to signature-based attack definitions only. The following options are available in this field:
Enabled
Disabled
Prompt for assignment after save
When selected, you are automatically prompted to select the Sensor resources to which you want to assign the policy.
Save
Click
Save to save the changes
Cancel
Reverts to the last saved configuration
All fields except
Simulated Blocking have the following 4 options:
Disabled
Inbound only
Outbound only
Inbound and Outbound
Click the
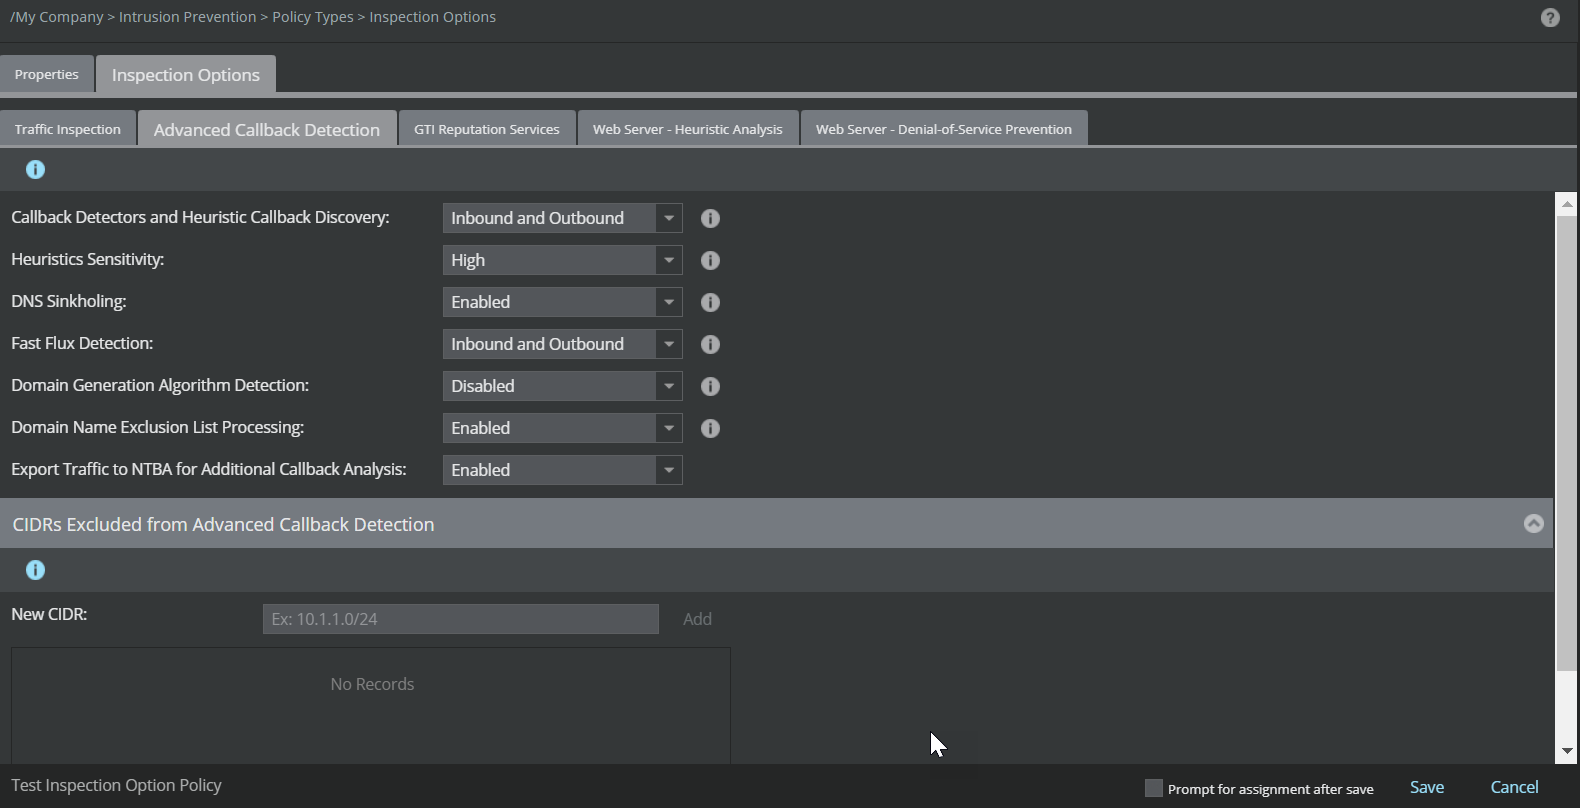
Advanced Callback Detection tab.
Advanced Callback Detection
The
Advanced Callback Detection tab displays the following fields:
Option
Definition
Callback Detectors and Heuristic Callback Discovery
Select any of the following options:
Disabled
Inbound only
Outbound only
Inbound and Outbound
Note
If you wish to disable
Layer 7 Data Collection option in
Traffic Inspection ensure that
Callback Detectors and Heuristic Callback Discovery option is also disabled.
Heuristic Sensitivity
The sensitivity level determines the level of confidence the heuristic engine must have for the analysis. For example, when a low sensitivity level (default) is selected, the engine must have high confidence that it has detected a Bot before raising an alert. Select the following sensitivity level options:
High
Medium
Low
DNS Sinkholing
Select any of the following options:
Enabled
Disabled
Fast Flux Detection
Select any of the following options:
Disabled
Inbound only
Outbound only
Inbound and Outbound
Domain Generation Algorithm Detection
Select any of the following options:
Disabled
Inbound only
Outbound only
Inbound and Outbound
Domain Name Exclusion List Processing
Select any of the following options:
Enabled
Disabled
Export Traffic to NTBA for Additional Callback Analysis
Enable this option to send the Botnet events to NTBA for further analysis.
CIDRs Excluded from Advanced Callback Detection
New CIDR
Enter the new CIDR and click
Add to add to the CIDR list to be excluded.
Click
to remove the CIDR from the list.
Prompt for assignment after save
When selected, you are automatically prompted to select the Sensor resources to which you want to assign the policy.
Save
Click
Save to save the changes.
Cancel
Reverts to the last saved configuration
Click the
GTI Reputation Services tab.
Endpoint Reputation Analysis The
Endpoint sub-tab in the
GTI Reputation Services tab displays the following fields:
Option
Definition
Endpoint Reputation Analysis
Select any of the following options:
Disabled
Inbound only
Outbound only
Inbound and Outbound
Note
Make sure
Layer 7 Data Collection is enabled in
Traffic Inspection tab to detect the GTI risky URL attacks.
Use Endpoint Reputation to Influence SmartBlocking
Select
Enabled to enable endpoint reputation to Influence SmartBlocking. Select
Disabled to disable the option.
Exclude Internal Endpoints from GTI Lookups
Select
Enabled to exclude internal endpoints from Trellix GTI Lookups. Select
Disabled to disable the option.
CIDRs Excluded from Endpoint Reputation Lookups
New CIDR
Enter the new CIDR and click
Add to add to the CIDR list to be excluded.
Click
to remove the CIDR from the list.
Note
The CIDR exclusion list is shared by
Advanced Callback Detection and
Endpoint Reputation Analysis
Protocols Excluded from Endpoint Reputation Lookups
In the drop-down list, select the protocol to be excluded from Trellix GTI Lookups and click
Add. The selected protocol is displayed in the field below.
Click
to remove the protocol from the list.
Prompt for assignment after save
When selected, you are automatically prompted to select the Sensor resources to which you want to assign the policy.
Save
Click
Save to save the changes.
Cancel
Reverts to the last saved configuration
The
URL sub-tab in the
GTI Reputation Services tab displays the following fields:
Option
Definition
URL Reputation Analysis
Select any of the following options:
Disabled
Inbound only
Outbound only
Inbound and Outbound
Minimal Risk URL
Select any of the following options:
Medium
High
Prompt for assignment after save
When selected, you are automatically prompted to select the Sensor resources to which you want to assign the policy.
Save
Click
Save to save the changes.
Cancel
Reverts to the last saved configuration
Click the
Web Server- Heuristic Analysis tab. In the
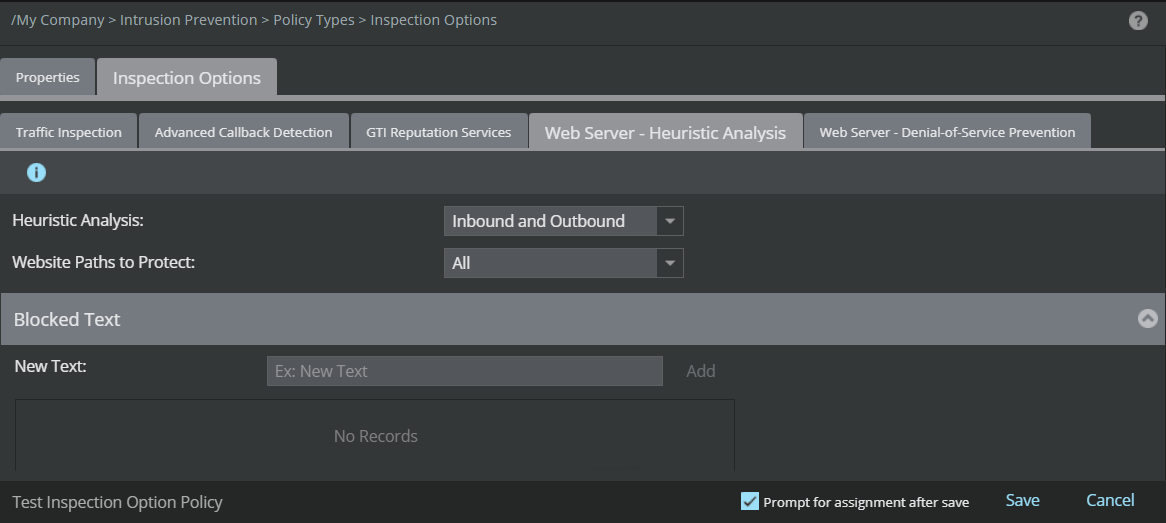
Web Server- Heuristic Analysis, you can enable behavior-based detection of attacks against your web servers. You can also optionally add blocked text, such as the name of a stored procedure that is treated as an attack.
Web Server- Heuristic Analysis
The
Web Server- Heuristic Analysis tab displays the following fields:
Option
Definition
Heuristic Analysis
Select any of the following options:
Disabled
Inbound only
Outbound only
Inbound and Outbound
Website Paths to Protect
Select
All to protect all website paths or select
Specific to protect specific website paths.
Website Paths to Protect
New Website Path
Enter the website paths that you want to protect and click
Add. The website path is displayed in the field below.
Click
to remove the website path from the list.
Note
This field is displayed only when you select the option
Specific in field
Website Paths to Protect
Blocked Text
New Text
Enter the blocked text which is treated as an attack and click
Add.The blocked text is displayed in the field below.
Click
to remove the blocked text from the list.
Prompt for assignment after save
When selected, you are automatically prompted to select the Sensor resources to which you want to assign the policy.
Save
Click
Save to save the changes.
Cancel
Reverts to the last saved configuration
Click the
Web Server - Denial-of-Service tab. In
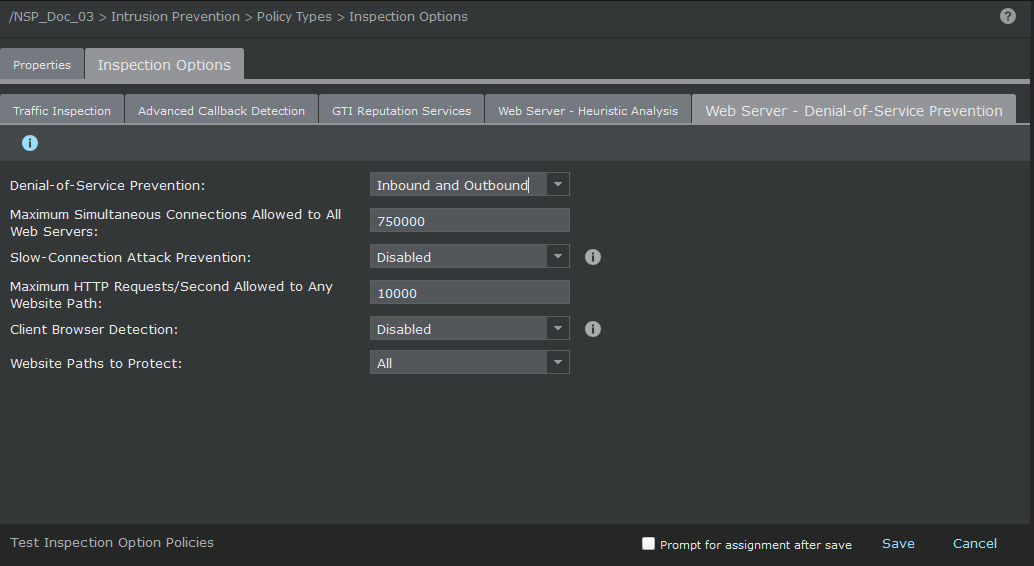
Web Server - Denial-of-Service, you can configure to prevent denial-of-service attacks.
Web Server - Denial-of-Service Prevention
The
Web Server - Denial-of-Service Prevention tab displays the following fields:
Option
Definition
Denial-of-Service Prevention
Select any of the following options:
Disabled
Inbound only
Outbound only
Inbound and Outbound
Maximum Simultaneous Connections Allowed to All Web Servers
Specify the threshold for maximum connections allowed to all web servers.
Slow-Connection Attack Prevention
Select the option
Enabled to close 10 percent of the oldest slow open connections. This option is
Disabled by default.
Maximum HTTP Requests/Second Allowed to Any Website Path
Specify the maximum HTTP requests/second that should be allowed to any website path.
Client Browser detection
Select the option
Enabled or
Disabled.
Browser Detection Method
The detection methods use the challenge/response mechanism to detect a valid client browser. The options are
HTML Challenge and
JavaScript Challenge
Note
This field is displayed only when you select the option
Enabled in field
Client Browser detection
Website Paths to Protect
Select
All to protect all website paths or select
Specific to protect specific website paths.
Website Paths to Protect
New Website Path
In the first text field, enter the website paths that you want to protect and in the second text field, enter the maximum number of requests per second to any website. click
Add. The website path and the maximum requests per second is displayed in the field below.
Click
to remove the website path and requests per second from the list.
Note
This field is displayed only when you select the option
Specific in the field
Website Paths to Protect
Prompt for assignment after save
When selected, you are automatically prompted to select the Sensor resources to which you want to assign the policy.
.png)
.png) .
The New Policy window opens with the Properties tab selected.
.
The New Policy window opens with the Properties tab selected..png)
.png)
.png) to remove the CIDR from the list.
to remove the CIDR from the list.
.png)
.png)