Before you begin
Make sure that attack set profiles that you intend to use in the IPS Policy are available.
Adding a policy in IPS policy takes you through the process of refining the parameters for securing your network. The following procedure explains the essential elements of a complete policy configuration.
Inbound and outbound refer to the direction that traffic is flowing with regard to the network. Inbound refers to traffic destined for the internal network, and outbound refers to traffic destined for the external network. Trellix recommends applying different attack set profiles for inbound and outbound traffic for the following reason: traffic coming into a network area, such as the DMZ, might only require the DMZ attack set profile, while traffic leaving the DMZ might be headed for external networks. Thus, a more generic attack set profile, such as the default attack set profile, better protects the outbound traffic.
Note
Separate attack set profiles for inbound and outbound can be applied to Sensors in SPAN or tap mode. If the Sensor is unable to determine the direction of the traffic, it enforces the inbound attack set profiles.
Note
While working within IPS policies, the task of creating or modifying settings opens up to four separate Java windows. Each window has either a Save or OK button as well as a Cancel button. Clicking Save saves the information to the database and closes all policy configuration actions. Clicking OK closes the subwindow that has been opened from within policy configuration, saving any changes made in that subwindow. Clicking Cancel ends any operation and closes the window. If you want to continue creating or modifying a policy, do not click either Save or OK until you have completed every tab, step, or action available in a window.
Task
- In the Manager, click Policy and select the required Domain.
-
Select
Intrusion Prevention → Policy Types → IPS.
The IPS page is displayed.
IPS page 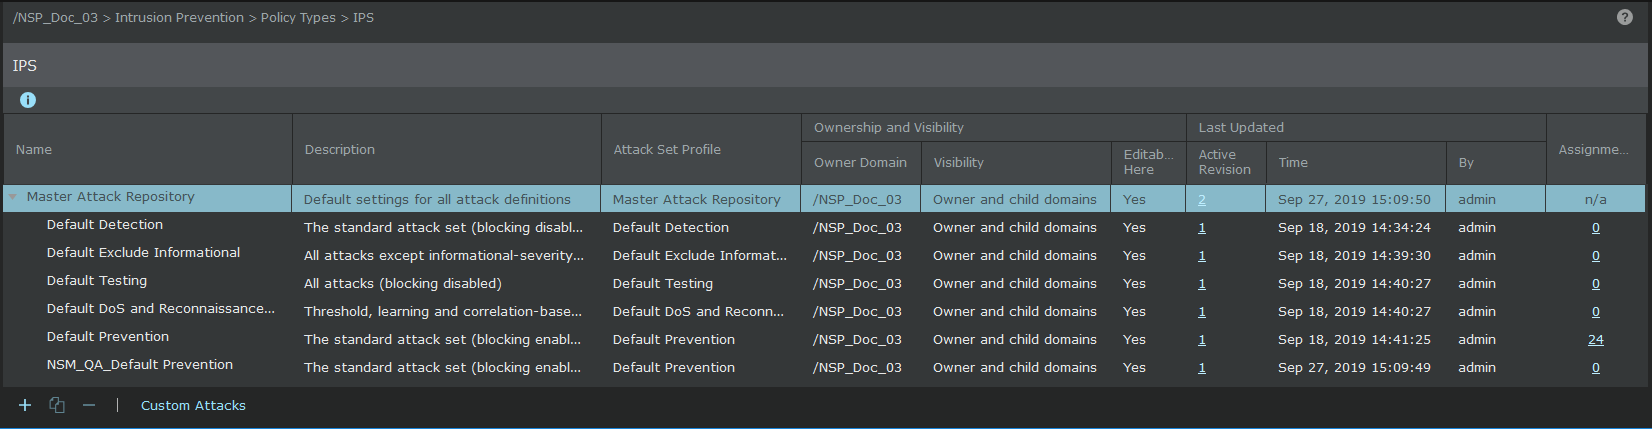
-
Click
.png) .
The New Policy window opens with the Properties tab selected.
.
The New Policy window opens with the Properties tab selected. -
Update the following fields:
Option Definition Name Enter a unique name to easily identify the policy. The name should contain only letters, numericals, spaces, commas, hyphens and underscores. Note
The name field should not be left blank and no special character should be entered while typing the name
Description Optionally describe the policy for other users to identify its purpose. Owner Displays the admin domain to which the policy belongs Visibility When selected, makes the policy available to the corresponding child admin domains. However, the policy cannot be edited or deleted from the child admin domains. From the drop-down list, select the option for the visibility level of the rule object.
Available options are Owner and child domains and Owner domain only.
Editable here The status Yes indicates that the policy is owned by the current admin domain. DoS Response Sensitivity Defines the level of sensitivity to potential Denial-of-Service attacks. The available options are Low, Medium and High. Policy Direction Select the option to specify the direction to which the policy should be applied. The available options are Consider Direction and Ignore Direction. Attack Set Profile Select the attack set profile for inbound and outbound traffic. Note
This field is displayed only when you select the Policy Direction option as Ignore Direction.
Inbound Attack Set Profile Select the inbound attack set profile from the drop-down list. Click
to add a new attack set profile.
Click
.png) to edit or view the selected attack set profile.
to edit or view the selected attack set profile.
Note
This field is displayed only when you select the Policy Direction option as Consider Direction.
Outbound Attack Set Profile Select the outbound attack set profile from the drop-down list. Click
to add a new attack set profile.
Click
to edit or view the selected attack set profile.
Note
This field is displayed only when you select the Policy Direction option as Consider Direction.
Statistics Lasted Updated Displays the time stamp when the policy was last modified Last Updated By Displays the user who last modified the policy Assignments Indicates the number of inline ports to which the policy is assigned Revisions Prompt for assignment after save If you clear this option you can save the policy now and assign it to the Sensor resources as explained in the following section. If you select this option, the Assignments window opens automatically when you save the policy and you can assign the policy to the required Sensor resources. Cancel Reverts to the last saved configuration -
Click
Evaluate Attack Set Profiles.
The Attack Definitions tab is displayed.
Attack Definitions tab 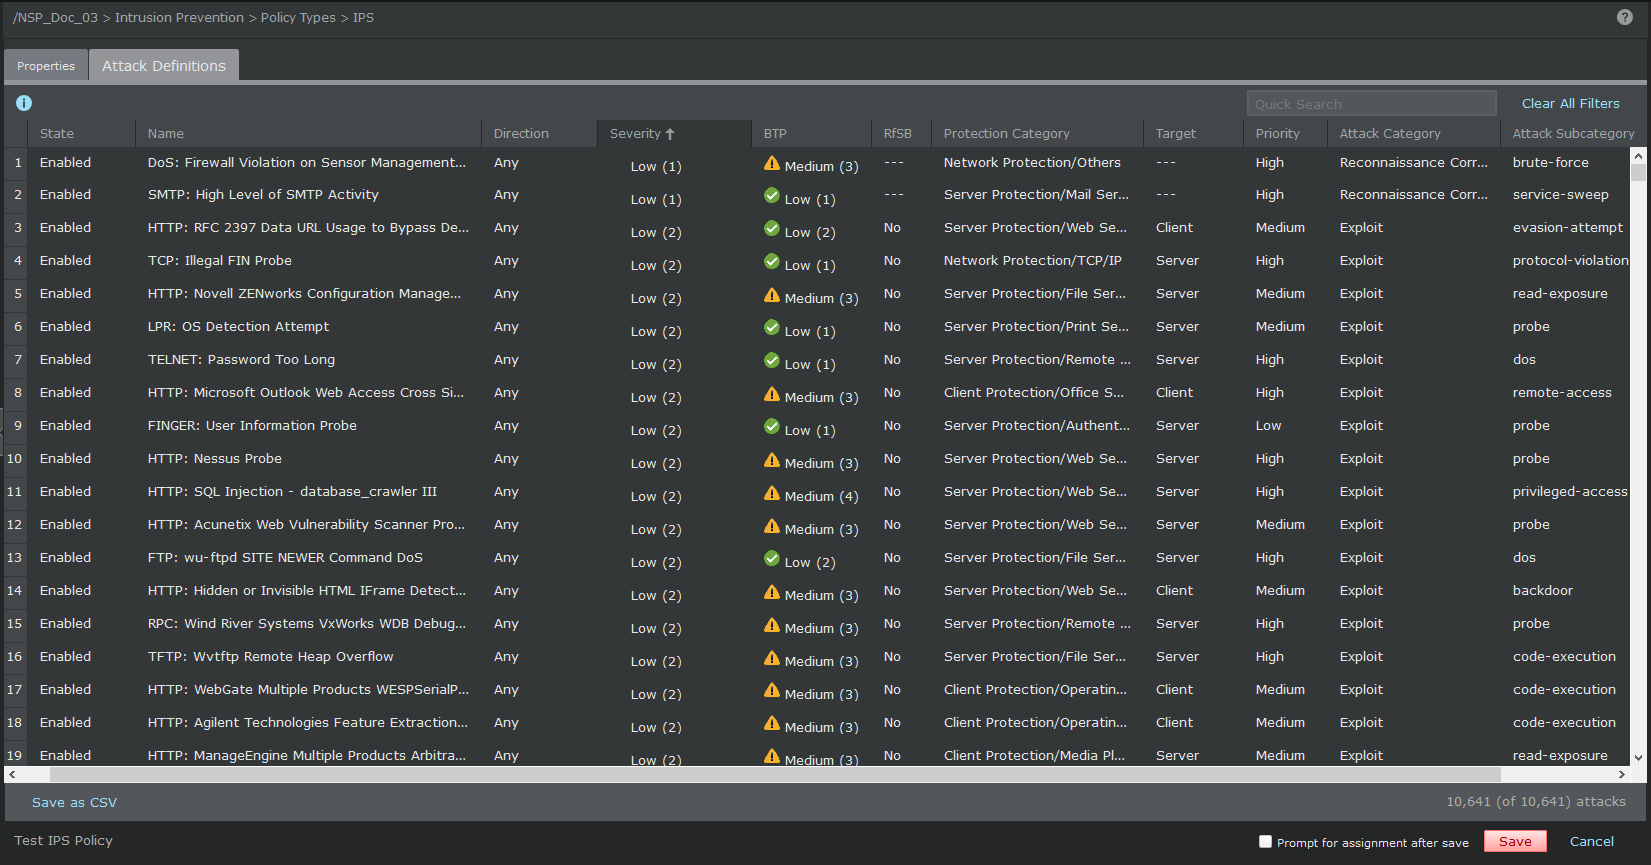
-
The following fields are displayed:
Option Definition State Displays the state as Enabled or Disabled Name Specifies the name of the attack Direction Displays the direction of attack as Inbound, Outbound or Any Severity Displays the severity level as High, Medium, Low, or Informational - For High severity, the score ranges between 7 and 9.
- For Medium severity, the score ranges between 4 and 6.
- For Low severity, the score ranges between 1 and 3.
- For Informational severity, the score is 0.
Prority Specifies the attack priority as High, Medium, or Low. By default, the Priority column is hidden. Note
The Prority attribute for any attack definition is pre-defined by Trellix Researchers to categorize the attack definitions available for different Sensor models and is not applicable for custom attacks.
BTP Displays the BTP level as High, Medium or Low - For High BTP, the score ranges between 7 and 9.
- For Medium BTP, the score ranges between 4 and 6.
- For Low BTP, the score ranges between 0 and 3.
RfSB Displays whether the attack is enabled for Smart blocking. The display is Yes for attacks with Smart blocking and No for attack without Smart blocking. Protection category Displays the protection category as Client Protection, Server Protection, Malware, Advanced Protection Options, or Network Protection Target Displays the target as Server, Client or Server or Client HTTP Response Attack Specifies the HTTP response as No, Yes or Auto Industry IDs Trellix IPS — Displays the unique identifier link for Trellix IPS. CVE — Displays the unique identifier link for the Common Vulnerability and Exposure standard. By clicking on the link you can view more details about the vulnerability.
Microsoft — Displays the ID of attack as listed in the Microsoft Security Bulletin
Bugtraq —
CERT —
ArachNIDS —
Protocols Displays the type of protocol Attack Category Displays the attack category. The attack categories are: - Exploit
- DoS Learning Attack
- DoS Threshold Attack
- Reconnaissance Attack
- Policy Violation
- Malware
Note
When you are working on Sensors prior to version 8.2, merge the IPS and reconnaissance attack settings from the Reconnaissance Attack Settings Merge Utilitypage. The reconnaissance attacks are not displayed on the Attack Definitions tab.
Attack SubCategory Displays the sub-category of the attack Customization Specifies whether the attack is customized or not (Yes or No) Manager Actions Specifies the Manager's action for the attack Sensor Actions Response: Displays the Sensor's response actions Capture Packets: Displays whether the captured packets are pre-attack packets or post attack packets
Last Updated The most recent version of the signature set in which the attack definition was updated Prompt for assignment after save If you clear this option you can save the policy now and assign it to the Sensor resources as explained in the following section. If you select this option, the Assignments window opens automatically when you save the policy and you can assign the policy to the required Sensor resources. Save Saves the attack definition configuration Cancel Reverts to the last saved configuration To enable an attack, select the row of an attack and click on the Enable button. For enabling multiple attacks simultaneously, select the rows by holding the Shift or Ctrl key and click on the Enable button.
To disable an attack, select the row of an attack and click on the Disable button. For disabling multiple attacks simultaneously, select the rows by holding the Shift or Ctrl key and click on the Disable button.
To export the attacks, click the Save as CSV button. The attack list is exported as an excel file.
Note
If you attempt exporting policies using Internet Explorer 10 in combination with Windows Server 2008/2012, the Manager will generate the “Export of custom policy error”. To avoid this, go to Control Panel → Add or Remove Programs → Add/ Remove Windows Components, the Windows Components Wizard window opens, select the Internet Explorer Enhanced Security Configuration and disable it. For more information on the fault, see the Trellix IPS Product Guide.
- Click Save to save the IPS policy.