---
title: "Back up your Manager (or Central Manager) data"
slug: "back-up-your-manager-or-central-manager-data"
tags: ["Product Usage", "IPS 10.1.10"]
updated: 2026-10-05T15:40:13Z
published: 2026-10-05T15:40:13Z
canonical: "docs.trellix.com/back-up-your-manager-or-central-manager-data"
---
> ## Documentation Index
> Fetch the complete documentation index at: https://docs.trellix.com/llms.txt
> Use this file to discover all available pages before exploring further.
# Back up your Manager (or Central Manager) data
You can back up your Manager data to your Manager server, or another media connected to your Manager, such as a tape drive. The backup file is saved by default within Manager program installation folder at <Manager_Install_Dir>\App\Backups.
The above is applicable to Trellix IPS Central Manager as well.
To back up your Manager data using Manager server:
## Task
1. Select
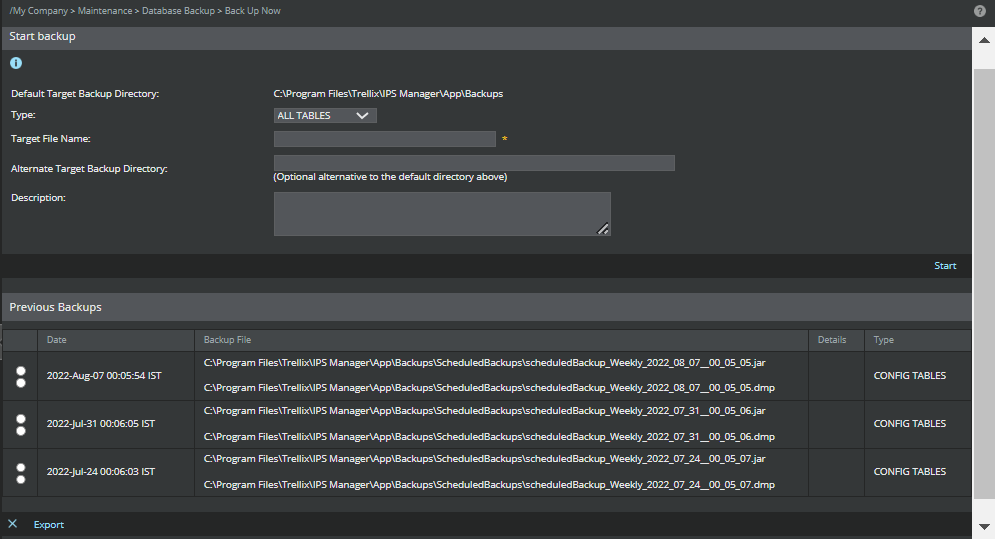
**Manager** → **** → **Maintenance** → **Database Backup** → **Back Up Now**.
Back Up Now page
> [!NOTE]
> Note
>
> To backup your Central Manager data, select **Manager** → **Maintenance** → **Database Backup** → **Back Up Now**. The fields displayed are similar to that of Manager described below.
2. Select one of the following
**Type** choices.
- **All Tables**— Provides backup for the entire database, that is, all configurations, user activity, and alert information.
- **Audit Tables**— Provides backup information related to user activity and Manager Health Status.
- **Config Tables**— Provides backup for the Manager configuration.
- **Event Tables**— Will backup alert, packetlog, host and Sensor performance events.
- **Trend Tables**— Will backup the trend patterns (daily/weekly/monthly) of alerts and Sensor performance events. The backup also includes the first-seen attack statistics.
> [!NOTE]
> Caution
>
> Do not make modifications to existing database records while doing an **All Tables** or **Audit Tables** backup, since such modifications are not allowed while a backup is occurring.
3. Type a
**Target File Name**. You can use alphanumeric characters including hyphens and underscores (for example,
**backup_01-10-03**).
4. (Optional) Type a location different from the default to be your
**Alternate Target Backup Directory**.
5. (Optional) Type a description of your backup in
**Description**.
6. Click
**Start**.
After a few moments, the following message appears: "Successfully backed-up data." The backup information appears in the List of
**Previous Backups**. At the backup location, an XML file with the backup file name contains the description entered in the
**Details** field.
> [!NOTE]
> Note
>
> Previous backups can be exported to a desired location by selecting the radio button against the backup in the **Previous Backups** list and clicking the **Export** button. The selected Backup in the Previous Backup list be deleted using the
>
> 
>
> button.