Task
-
To add an SNMP server, go to the
SNMP tab and click the
.png) icon at the bottom-left corner of the page.
The SNMP Forwarder Configuration Details panel opens to the right of the page.
icon at the bottom-left corner of the page.
The SNMP Forwarder Configuration Details panel opens to the right of the page.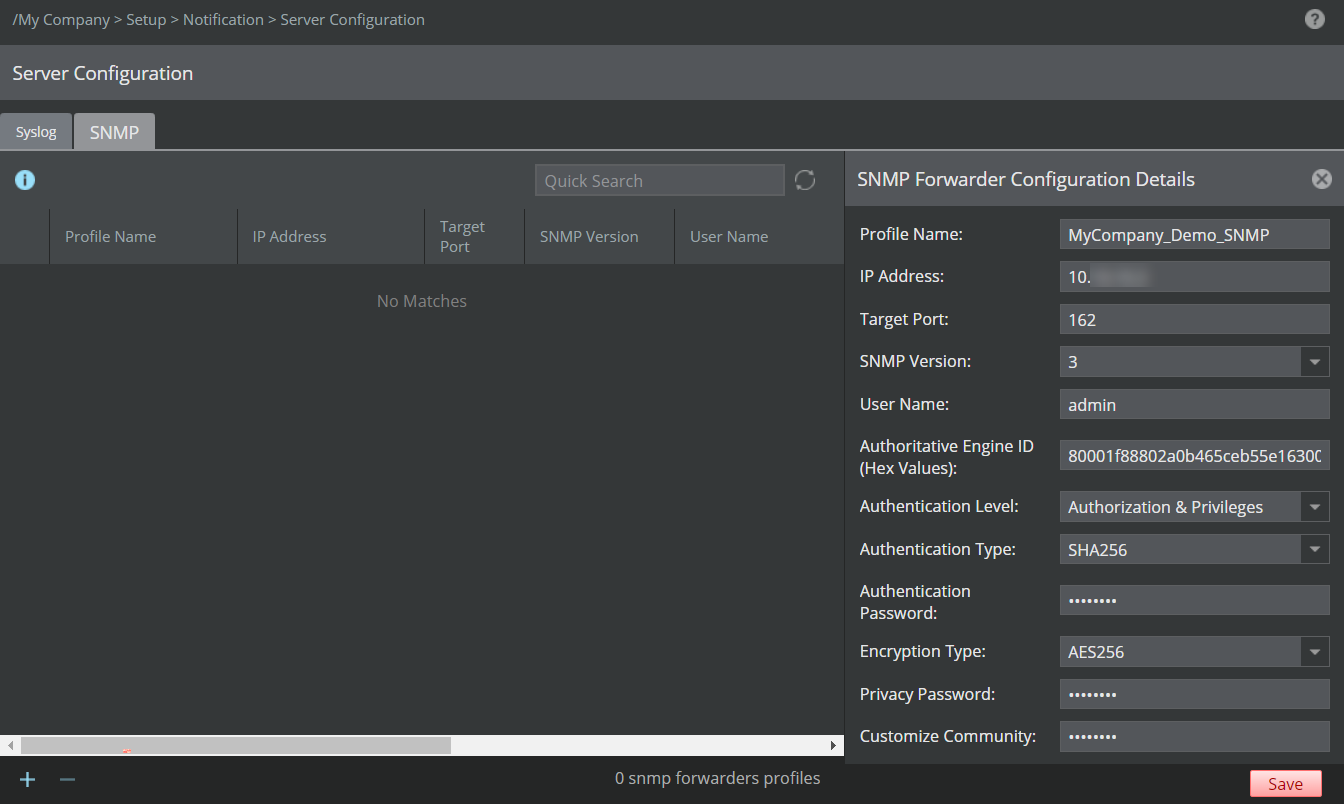
-
Specify your options in the appropriate fields.
Field Description Profile Name Specify a profile name for the server addition. This name will be used while configuring the SNMP notification profile. Note
It is recommended to specify the Server Profile Name as <DomainName>_<ServerProfileName> to avoid confusing with child domains names.
IP Address IP address of the target SNMP server. This can be an IPv4 or IPv6 address. Target Port SNMP listening port of the target server SNMP Version The version of SNMP running on your target SNMP server. Version options are 1, 2c, Both 1 and 2c, and 3. Community String Enter an SNMP community string to protect your Trellix IPS data. SNMP community strings authenticate access to Management Information Base (MIB) objects and functions as embedded passwords. The following fields appear only when SNMP Version 3 is selected. Username Username for authentication Authoritative Engine ID (Hex Values) The authoritative (security) engine ID used for SNMP version 3 REQUEST messages by primary Manager. The length of the hex value of the Authoritative Engine ID should be between 10 and 50 hexadecimal characters.
Authoritative Peer Engine ID (Hex Values): Note
The Authoritative Peer Engine ID field is available while configuring SNMP version 3 only after successful creation of an MDR pair.
The authoritative (security) engine ID used for SNMP version 3 REQUEST messages by secondary Manager. Note
The Authoritative (security) engine ID for any Manager is unique. At any point of time, the Authoritative Engine ID of the Manager is static irrespective of Manager status in case of an MDR pair. That is, when MDR switchover occurs, the authoritative engine ID of the Manager will not change with the status of the Manager. Hence, the alerts generated from the Primary and Secondary Manager will have their respective authoritative engine IDs.
Note
After successful deletion of an MDR pair, the Authoritative Engine IDs are retained by the respective Managers.
Authentication Level This specifies the authentication level and has the following categories: - No Authorization, No Privileges — Uses Username match for authentication
- Authorization, No Privileges — Provides authentication based on the MD5 or SHA algorithms
- Authorization and Privileges — Provides authentication based on the MD5 or SHA algorithms. It also provides encryption in addition to authentication based on the DES or AES standards.
Customize Community Enter an SNMP community string to protect your Trellix IPS data. SNMP community strings authenticate access to Management Information Base (MIB) objects and functions as embedded passwords. The following fields appear only when Authorization, No Privileges is selected as Authentication Level: Authentication Type The authentication protocol (MD5, SHA, or SHA256) used for authenticating SNMP version 3 messages Authentication Password The authentication pass phrase used for authenticating SNMP version 3 messages The following fields appear only when Authorization and Privileges is selected as Authentication Level: Authentication Type The authentication protocol (MD5, SHA, or SHA256) used for authenticating SNMP version 3 messages Authentication Password The authentication pass phrase used for authenticating SNMP version 3 messages Encryption Type The privacy protocol (DES, AES, or AES256) used for encrypting SNMP version 3 messages Note
AES256 appears in the drop-down menu only when you choose SHA256 as the Authentication Type.
Privacy Password The privacy pass phrase used for encrypting SNMP version 3 messages -
Click
Save.
The SNMP server is added under the SNMP tab.
Note
Do not use a broadcast IP address (that is, 255.255.255.255) as the target SNMP server for forwarding alerts.
- If you want to modify an existing entry, double-click the specific SNMP entry. The SNMP Forwarder Configuration Details panel opens where you can update the required fields and save the changes.
-
In case you want to delete an existing server, select the specific entry and click
.jpg) . You can delete only one server entry at a time.
. You can delete only one server entry at a time.