---
title: "Configure Vulnerability Manager settings in Manager"
slug: "configure-vulnerability-manager-settings-in-manager"
tags: ["Integration", "IPS 10.1.10"]
updated: 2026-09-03T10:39:05Z
published: 2026-09-21T08:20:29Z
canonical: "docs.trellix.com/configure-vulnerability-manager-settings-in-manager"
---
> ## Documentation Index
> Fetch the complete documentation index at: https://docs.trellix.com/llms.txt
> Use this file to discover all available pages before exploring further.
# Configure Vulnerability Manager settings in Manager
## Before you begin
Disabling CBC protection allows the integration. Cipher block chain (CBC) protection is an operating mode in cryptography. Java uses CBC protection in SSL connections to counter the Beast Exploit against SSL/TLS (BEAST) threat, and a security vulnerability in an SSL socketFactory method. This security fix was introduced in Java version 6u29, which also introduced a bug that prevents SSL connections to SQL Server 2008. As a result, CBC protection interferes in the integration between the Manager and MS SQL database of Vulnerability Manager. Therefore, before you proceed with your configuration of Vulnerability Manager in the Manager, disable this feature by performing the steps below:
1. Locate the
**tms.bat** file in
%programfiles%\Trellix\IPS Manager\App\bin.
2. Open the file in a notepad application.
Text to disable CBC protection in Java
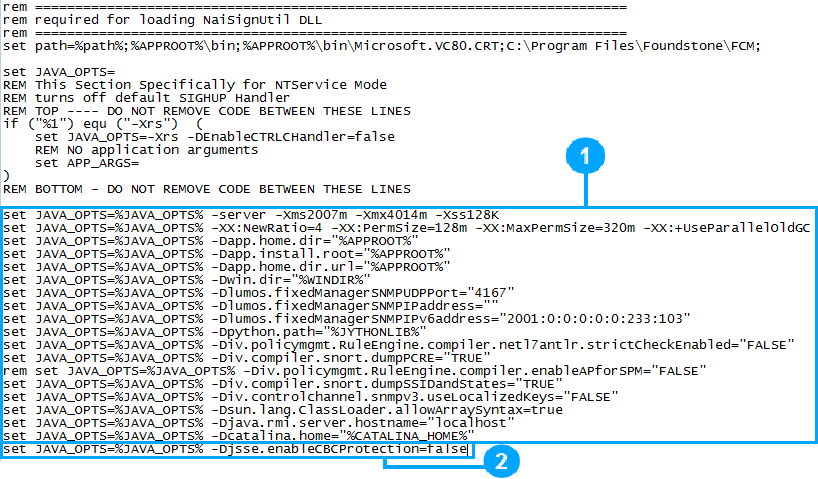
3. Scroll to locate the text displayed in the image as
.
4. Once you have located the text, append it with the following entry:
set JAVA_OPTS=%JAVA_OPTS% -Djsse.enableCBCProtection=false
The text must be entered as displayed in the image as .
5. Save and the close the file.
6. Reboot the Manager.
Once the Manager is back up you may proceed with the configuration.
The Vulnerability Manager configuration settings allow Manager to connect directly to the Scan engine servers and database.
You can configure the settings in two ways:
## Task
1. Manually navigating the configuration screens.
2. Using the Vulnerability Manager Configuration Wizard
**Manually navigating the configuration screens**
Following steps are essential for manually configuring Vulnerability Manager settings (in the given order):
**Using the Vulnerability Manager Configuration Wizard**
The Vulnerability Manager Configuration Wizard helps you to navigate the screens in the desired sequence.
Select
**Manager** → **** → **Integration** → **Vulnerability Assessment** → **MVM** → **Vulnerability Scanning** → **Summary**.
Or,
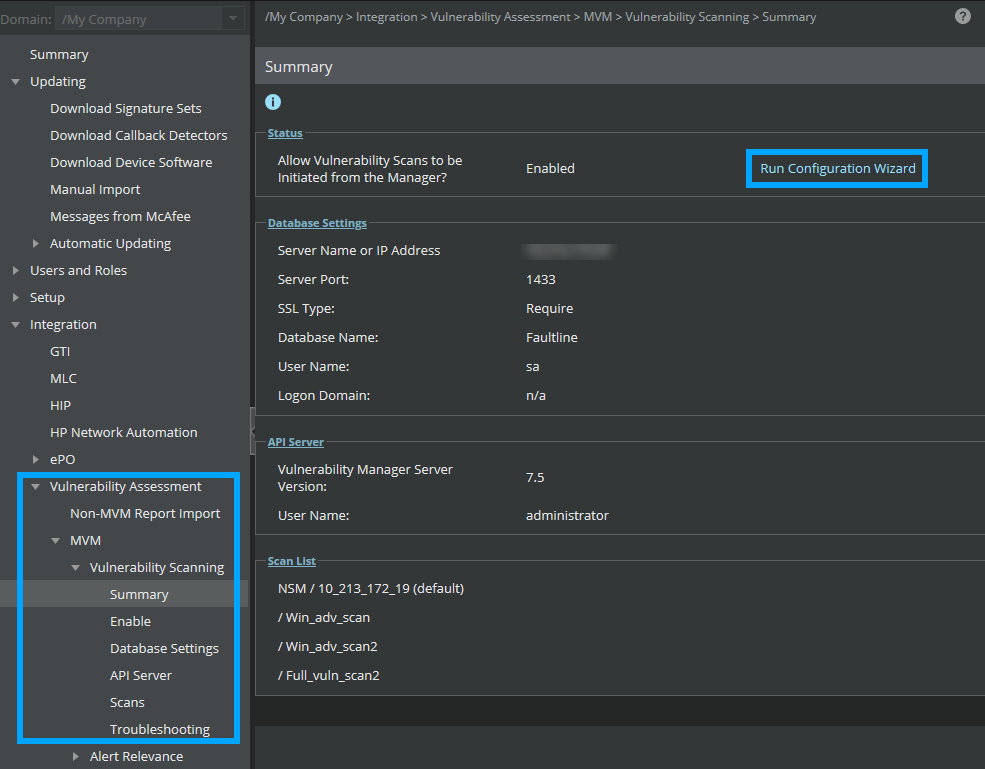
**Manager** → **** → **Integration** → **Vulnerability Assessment** → **MVM** → **Vulnerability Scanning** → **Summary** and click
**Run Configuration Wizard** to start the Vulnerability Manager Configuration Wizard.
Vulnerability Manager Summary sub-tab
- Enabling Vulnerability Manager scanning — This is the first step required for successfully using the Vulnerability Manager on-demand scan functionality from Threat Explorer.
- Configuring Vulnerability Manager database settings — This step is essential for Manager to connect to the Vulnerability Manager database server, and import the required information from the database.
- Configuring Vulnerability Manager Server settings — Manager uses information from the Vulnerability Manager server to initiate Vulnerability Manager scans from Threat Explorer.
- Adding Vulnerability Manager scan configurations — If the IP address of the scanned host falls within any of the scan configurations added to Manager, that scan configuration is used for on-demand scan of the host from Threat Explorer. This step completes the configuration settings for Vulnerability Manager in Manager.
## Configuring Vulnerability Manager Settings in the Secondary Manager
If you have an MDR setup, before you proceed with your configuration of Vulnerability Manager in the Secondary Manager, perform the steps below:
> [!NOTE]
> Note
>
> Ensure that the Secondary Manager is in standby mode.
### Task
1. Locate the
**tms.bat** file in
%programfiles%\Trellix\IPS Manager\App\bin.
2. Open the file in a notepad application.
Text to disable CBC protection in Java

3. Scroll to locate the text displayed in the image as
.
4. Once you have located the text, append it with the following entry:
set JAVA_OPTS=%JAVA_OPTS% -Djsse.enableCBCProtection=false
The text must be entered as displayed in the image as .
5. Save and close the file.
6. Reboot the Secondary Manager.
7. Make the Secondary Manager active by clicking
**Force Switch** in the
**Manager** → **** → **Setup** → **MDR**.
8. Start the FCM agent service. From the Windows
**Start** button, click
**Run** and open
**Services**.
You can find the
**Found stone Configuration Management (FCM) Agent**.
9. Click the
**Start** button () to start the FCM Agent service.
10. In the Manager, select
**Manager** → **** → **Integration** → **Vulnerability Assessment** → **MVM** → **Vulnerability Scanning** → **API Server**.
The
**Retrive MVM Certificate** option is enabled.
11. Click
**Retrive MVM Certificate** to import the client certificates into the Manager keystore.