---
title: "Core attribute"
slug: "core-attribute-1"
tags: ["Product Usage", "IPS 10.1.10"]
updated: 2026-10-05T15:40:31Z
published: 2026-10-05T15:40:31Z
canonical: "docs.trellix.com/core-attribute-1"
---
> ## Documentation Index
> Fetch the complete documentation index at: https://docs.trellix.com/llms.txt
> Use this file to discover all available pages before exploring further.
# Core attribute
Core attribute — Attacker IP Address
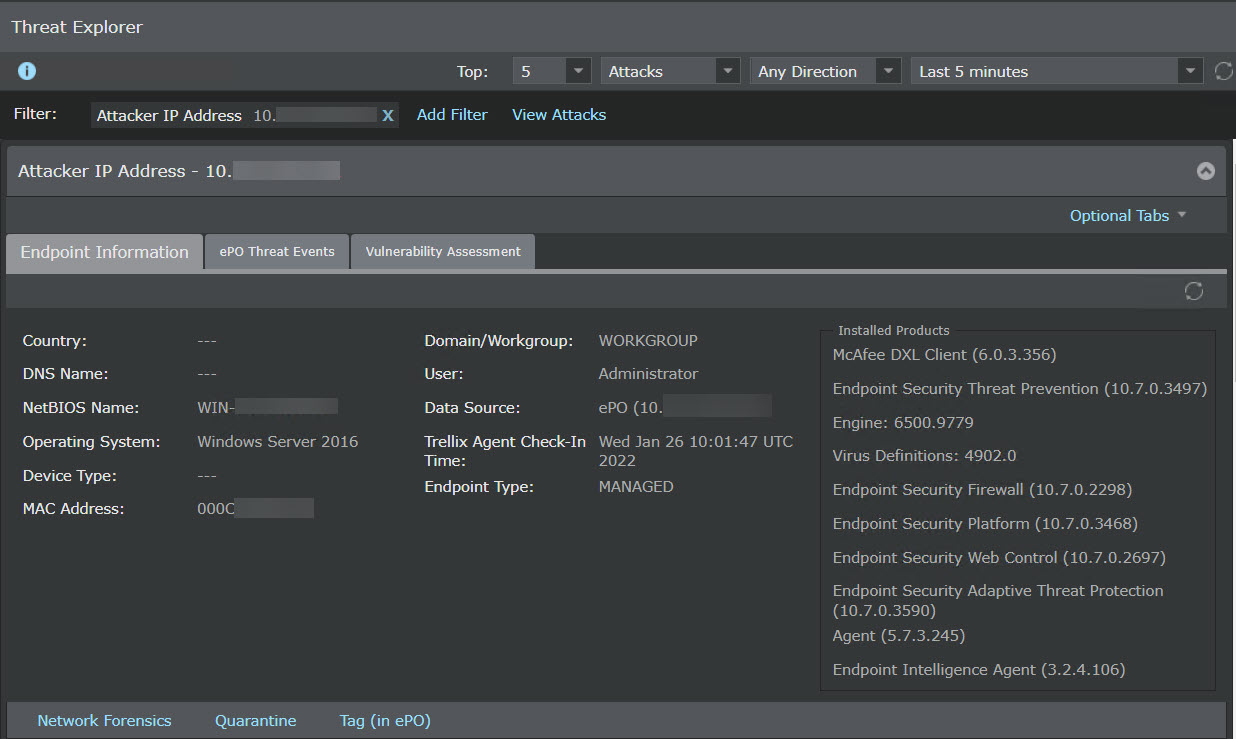
Select the core attribute as **Attacker IP Address** and click the hyperlink to view the following details:
- Endpoint Information
- ePO Threat Events
- Vulnerability Assessment
**Endpoint Information**
The additional information displayed in the Endpoint Information section is shown in the following table.
| Item | Description |
| --- | --- |
| **Country** | Country of the endpoint |
| **DNS Name** | DNS name of the endpoint to resolve the names to IP addresses |
| **NetBIOS Name** | NetBIOS name of the endpoint to access the host machines |
| **Operating system** | Operating system platform of the endpoint |
| **Device Type** | Type of the Sensor (for example, IPS Sensor) |
| **MAC Address** | MAC address of the endpoint |
| **Domain/Workgroup** | Domain or workgroup of the endpoint |
| **User** | Operating system user name of the endpoint |
| **Data Source** | Database tables from where information is retrieved |
| **Trellix Agent Check-In Time** | Check-in time of the Trellix Agent that communicates with the same ePO server integrated with the admin domain |
| **Endpoint Type** | Type of endpoint: - UNMANAGED (No Agent)— This indicates that there is no Trellix Agent installed on the endpoint. - UNMANAGED (MANAGED)— This indicates that the endpoint has a Trellix Agent but there is no active communication channel between the Agent and ePO server integrated with the admin domain. |
| **Installed products** | List of the installed products |
The
**Endpoint Information** sub-tab shows the following details specific to the endpoint.
- **Network Forensics** — Click this tab to analyze the network behavior of the endpoint when NTBA is configured.
Network Forensics page

You can filter your view by choosing the time and date of your choice.
Date and time options in Network Forensics page

You can view the data according to your time preference by selecting the time period from the drop-down list. You can use the
 icon to view the details before and after any event/attack.
Show option

The following table shows the information displayed in the
**Network Forensics** section.
| Item | Description |
| --- | --- |
| **Summary** | Endpoint summary that includes IP address, country of the endpoint, etc. View the client connections from this endpoint that include the TCP services, UDP services, etc. View the server connections to this endpoint that include the TCP services, UDP services, etc. |
| **Suspicious Flows** |
| *Suspicious activity indicator* | View indicators that map to an event like an alert or attack. |
| **IP Address** | Specify an IP address and use Search to view flows for this address. |
| **Time** | Displays the date and time when the suspicious flow for an event occurred > [!NOTE] > Tip > > You can sort the flows view based on time. |
| **Suspicious Activity** | Displays the indicator that specifies the suspicious activity performed like an URL accessed that was involved in another attack, blocked executable accessed and others |
| **Source** | Specifies the source from which the flow was initiated for an endpoint. Details include endpoint and ports used. |
| **Destination** | Specifies the destination details like endpoint involved and port |
| **Applications** | Displays the applications accessed from the endpoint |
| **Attack** | Attacks for a specific endpoint that include attack name and result |
| **File / URL Accessed** | Specifies file or URL access details for a specific endpoint |
To close the network forensics page, click the  icon.
For more information, see the section [Using context-aware data for network forensics](/network-and-platform/docs/using-context-aware-data-for-network-forensics).
- **Quarantine** — Use this option to block all the traffic originating from the specified IP address seen on the selected device for the selected time.
Quarantine Endpoint dialog
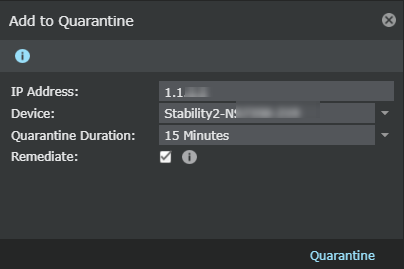
To quarantine endpoints to block all the traffic originating from the specified IP address:
| Option | Definition |
| --- | --- |
| **IP Address** | Enter the IP address of the endpoint. |
| **Device** | Select the specific device of the endpoint whose traffic originating from the IP address you want to block. |
| **Quarantine Duration** | Select the quarantine duration from the drop-down list. |
| **Remediate** | Select the checkbox to redirect the configured endpoint to the configured remediation portal. > [!NOTE] > Note > > You can configure the remediation portal settings in **Devices** → **Global** → **IPS Device Settings** → **Quarantine** → **Remediation Portal** > > Remediation cannot be configured for IPv6 address. The checkbox and the information icon for remediation is not displayed if you enter an IPv6 address in the **IP Address** field. |
Click **Quarantine**. The endpoint is added and displayed in the **Quarantine** page.
- **Tag (in ePO)**— Use this option to assign a tag to the selected endpoint in
Trellix ePO - On-prem.
You are able to assign tags only to endpoints whose **Endpoint Type** denotes MANAGED. This means that the endpoint runs a suitable version of Trellix Agent and is managed by Trellix ePO - On-prem.
To assign a tag:
1. Select a tag from the drop-down list. If the tag you looking for does not appear in the list, click the refresh button.
2. Click
**Tag**.
If the tagging is successful you receive a message stating its success. If not, you receive a failure notification.
**ePO Threat Events**
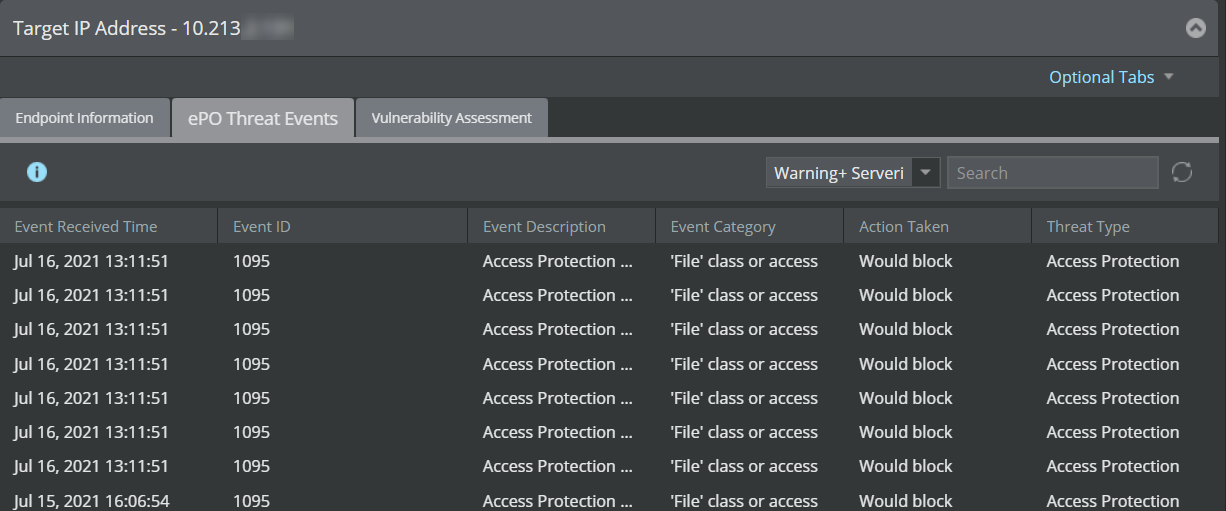
The **ePO Threat Events** sub-tab displays the latest **50 Threat Events** listed in the ePolicy Orchestrator - On-prem for a selected endpoint. The information displayed under this sub-tab includes the date and time at which the threat event was generated, the ID associated with the event, the event description, event category, action taken on the event, and the type of the threat that triggered the event.
You can click the  icon to refresh the list and view the latest **50 Threat Events** listed in the ePolicy Orchestrator - On-prem for the selected endpoint. The **Search** text field allows you to search for a specific event based on the **Event Received Time**, **Event ID**, **Event Category** and **Threat Type**. For example, to view all events associated with the Event ID 1095, type 1095 in the **Search** field.
> [!NOTE]
> Note
>
> The sub-tab has **Any Severity** filter selected by default. With this filter selected, the sub-tab displays all types of events including those which are informational and/or of low-severity. Such events act as noise and impede one's ability to find true threats. To exclude these events, select the **Warning+ Severity Only** filter from the drop-down menu. This displays only those events with Critical, Alert and Warning severity.
> [!NOTE]
> Note
>
> Ensure that the ePO server has the latest Trellix IPS Extension file installed. For information on how to download and install the Trellix IPS Extension, see the section Install Trellix IPS extension file in Trellix ePO - On-prem in Trellix Intrusion Prevention System Integration Guide.
ePO Threat Events sub-tab
**Vulnerability Assessment**
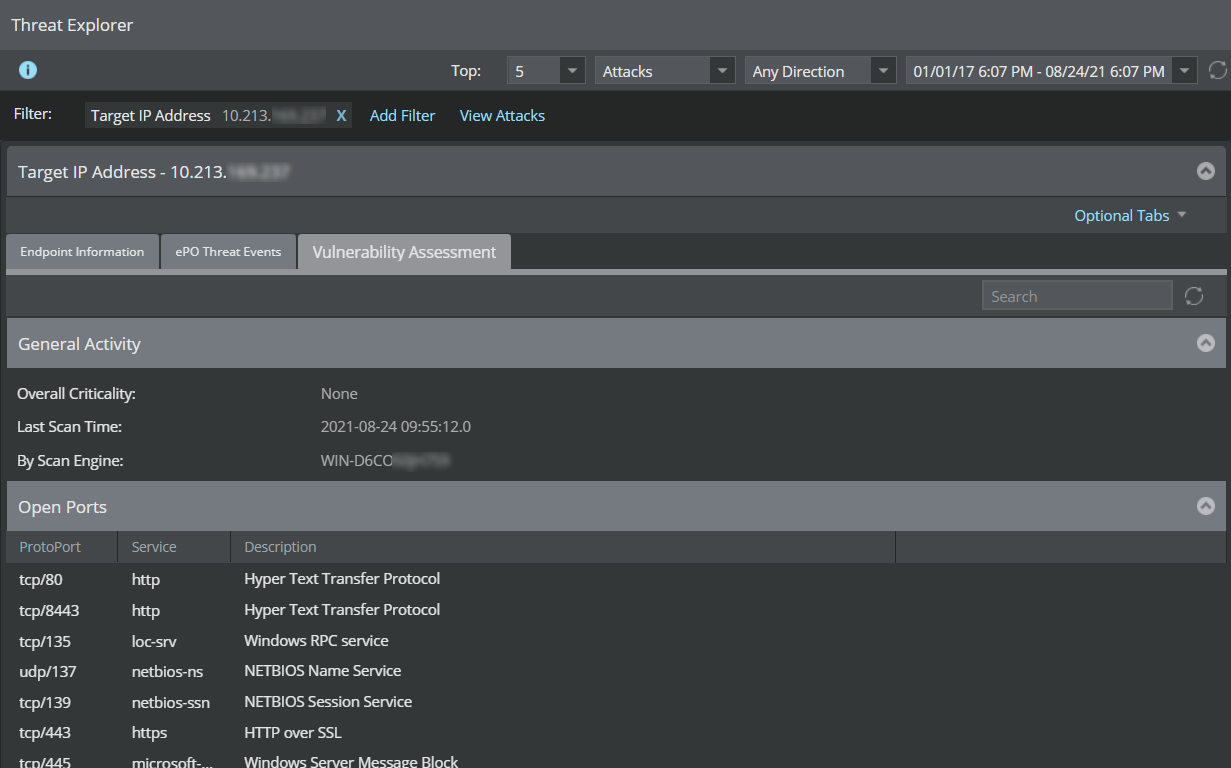
The **Vulnerability Assessment** sub-tab displays the following details. This tab will be populated with vulnerability assessment scan results for the selected endpoint when integration with McAfee Vulnerability Manager (MVM) is enabled.
Vulnerability Assessment sub-tab
To scan for vulnerabilities:
1. Click
 button to scan for vulnerabilities against the selected host.
> [!NOTE]
> Note
>
> If the selected IP address is found in an MVM scan configuration, it displays a message to inform that the scan is successful. If the selected IP address is found in more than one available MVM scan configuration, the **Scan for Vulnerabilities** window is displayed.
Vulnerability Assessment sub-tab
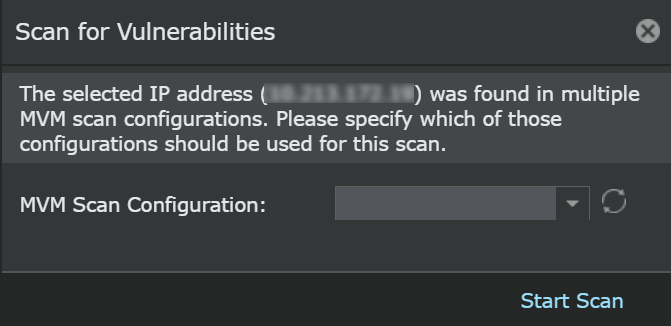
2. Select an MVM configuration from the
**MVM Scan Configuration** drop-down list.
3. Click
**Start Scan**
to run the scan.
> [!NOTE]
> Note
>
> To refresh the configuration, click
>
> 
>
> .
> [!NOTE]
> Note
>
> If the selected IP address is not found in any of the MVM scan configuration, a warning message is displayed informing that the default configuration will be used for the scan. Click **OK** to proceed with the scan. **Scan for Vulnerabilities** option is available only when integration with Vulnerability Manager is enabled and if you have edit privileges to run the scan.
| Item | Description |
| --- | --- |
| **General Activity** | The following details are displayed: - **Overall Criticality**: Criticality level of the endpoint - **Last Scan Time**: Date and time of the latest scan - **By Scan Engine**: Name of the scan engine |
| **Open Ports** | The following open port details are displayed: - **Protoport**: Port ID - **Service**: Name of the service running on the port - **Description**: Description of the service |
| **Vulnerabilities** | The following vulnerability details are displayed: - **Risk**: Specifies the risk level. Example: Informational. - **Name**: Name of the service running on the port - **CVE**: CVE ID hyperlink of the vulnerability that displays more information on the vulnerability |
At any time, you can click  to leave the selected core attribute and return to the main **Threat Explorer** page.