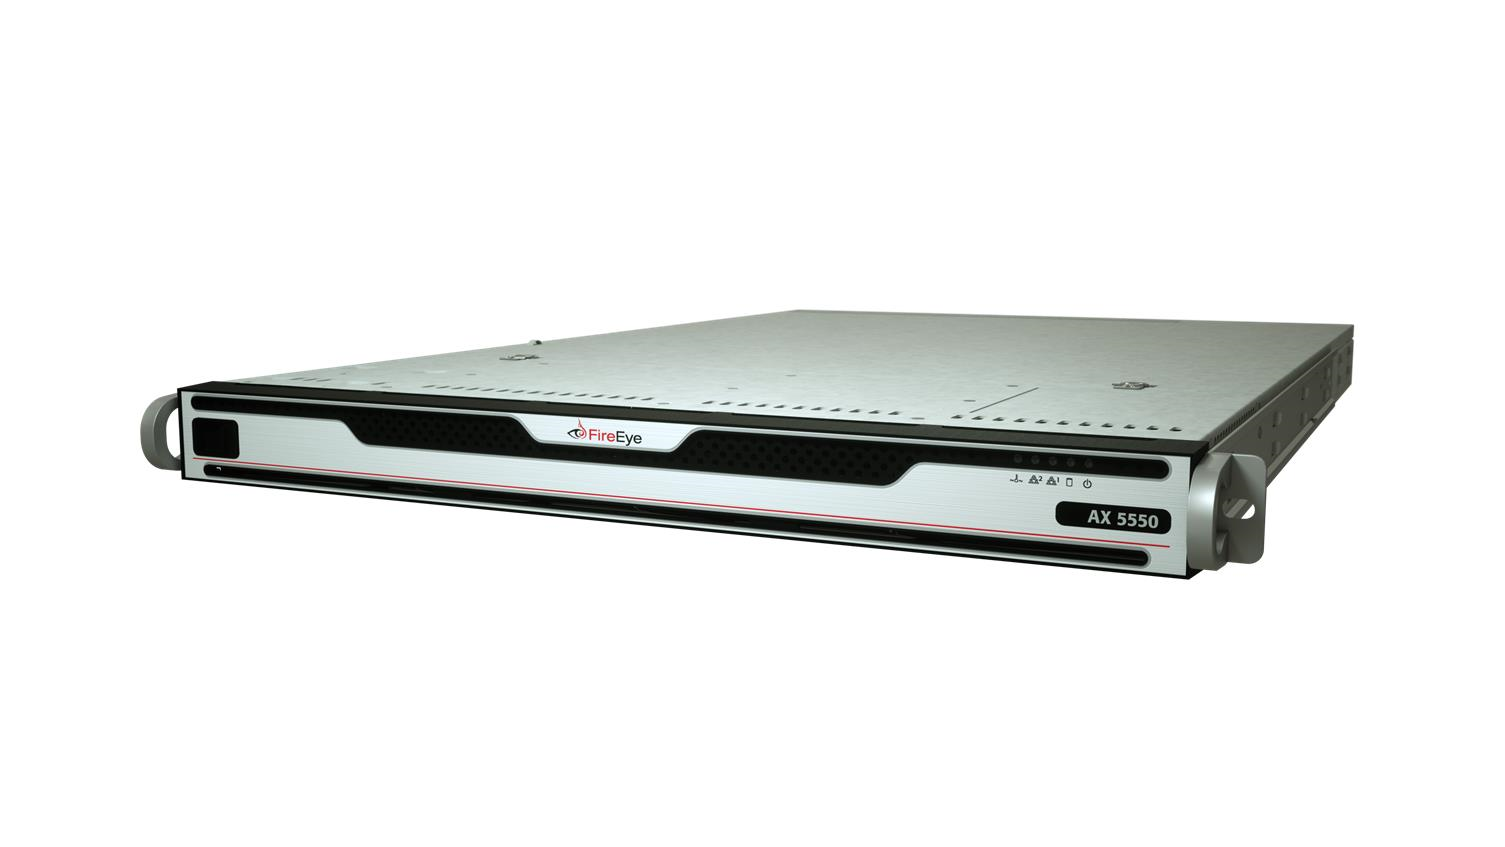
The Front View

1) Bezel Release | 4) LAN 2 LED |
2) Universal Information LED | 5) Device Activity LED |
3) LAN 1 LED | 6) Power LED |
Bezel Release: Slide the release tab to the right to remove the bezel from the appliance to access the chassis.
LEDs
The front panel has LEDs that provide critical information about parts of the appliance.
The following table describes each LED.
LED | Flashing | Steady | Off | Normal |
|---|---|---|---|---|
Universal Information | Flashing once per second and red indicates fan failure. Flashing once every four seconds and red indicates power failure. Flashing and blue indicates IPMI-activated UID. | Solid and red indicates overheating, which may be caused by cables obstructing the airflow in the appliance or the ambient room temperature being too high. Solid and blue indicates the local UID button has been pressed. | Operating normally | Off |
LAN 1 | Network activity via ether1 port | N/A | No activity | Flashing |
6
© 2019 FireEye
The Front View
LED | Flashing | Steady | Off | Normal |
|---|---|---|---|---|
LAN 2 | Network | N/A | No | Flashing |
Device | Operating | N/A | No | Flashing |
Power | N/A | Operating normally | Not | Steady |
Chassis

1) Disk Drive Carrier | 3) Reset Button |
2) Unit Identifier Button | 4) Power Button |
Disk Drive Carrier: Each carrier can house a hot-swappable disk drive.
Buttons
The chassis has one reset button, one power button, and one UID button.
Unit Identifier Button: Pressing this button illuminates an LED on both the front and rear of the chassis for easy system location. The LEDs remain on until the button is pressed a second time.
Reset Button: Use the reset button to restart the appliance.
Power Button: Use the power button to turn the appliance on or off. Turning off the power with this button removes the main power but keeps the standby power supplied to the appliance. Therefore, unplug the appliance before servicing.
© 2019 FireEye
7
AX Series Hardware Administration Guide
CHAPTER 1: The AX 5550
The Rear View

1) Power Port | 5) USB 3.0 Ports |
2) Serial Console Port | 6) ether1 (RJ45) Management 1 Port |
3) IPMI/Serial over Ethernet Port | 7) ether2 (RJ45) Monitoring 2 Port |
4) USB 2.0 Ports | 8) Video Port |
Power Port
Power: Connect your power source to this port to provide power to the appliance. The appliance comes with one redundant power supply unit for use if the primary unit fails.
I/O Ports
Video: Connect a monitor to this port to view the appliance's command-line interface.
USB 2.0: These ports are USB 2.0 compliant.
USB 3.0: These ports are USB 3.0 compliant.
Serial Console: Connect to this port to manage the appliance from your terminal.
Management Ports
ether (RJ45): Connect your LAN to this port to enable remote access to the CLI and Web UI. The RJ45 connector is a 10/100/1000BASE-T port.
IPMI: Connect for access to out-of-band management functions, including power control, console redirection, and appliance health status. The connector is a 100BASE-T port.
8
© 2019 FireEye
AX Series Hardware Administration Guide
Sandbox Analysis Deployment
CHAPTER 2: Deployment
The AX Series appliance provides two types of malware analysis—sandbox and live. Sandbox malware analysis generates a report on the malware using resources and threat intelligence within a closed environment. Live malware analysis allows the malware to make callbacks and interact with foreign objects via a connection outside the local network. For more information about selecting and configuring an analysis mode, see “Malware Analysis” in the AX Series Threat Management Guide of your software release.
Install the AX 5550 in your network according to one of the following deployments:
Sandbox Analysis Deployment below
Sandbox Analysis with Proxy Deployment on the next page
Live Analysis Deployment with Dedicated Internet Link on page 12
Live Analysis Deployment on page 11
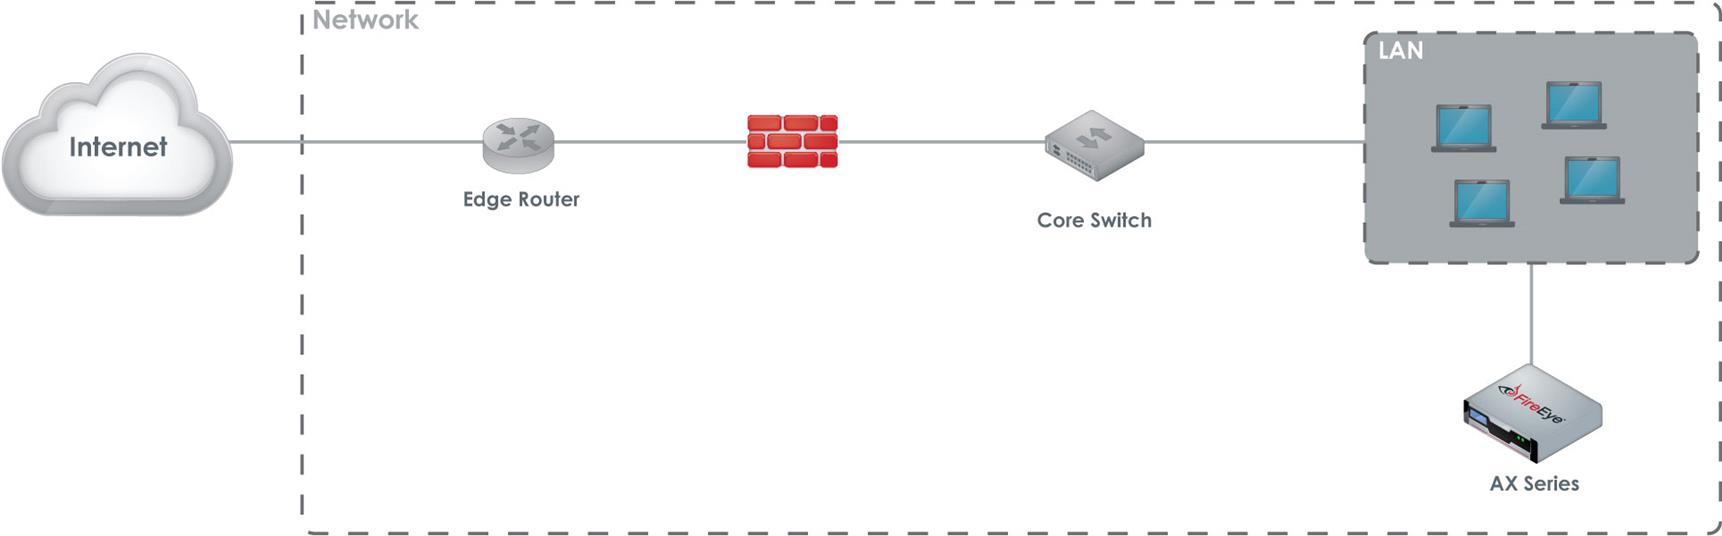
Sandbox Analysis Deployment
To install the AX 5550 in your network so that only sandbox analysis can be enabled, connect it to the LAN within your network, as shown in the following diagram.
 The AX 5550 uses HTTPS. If your LAN requires the use of a proxy for all HTTPS requests, you need to connect the AX 5550 to a proxy.
© 2019 FireEye
9
AX Series Hardware Administration Guide
CHAPTER 2: Deployment
Prerequisites
Before connecting the AX 5550 to your network, ensure that your LAN-facing switch provides 10/100/1000BASE-T Ethernet output.
Cabling
To connect your AX 5550 to your LAN:
Connect one end of an Ethernet cable to the ether1 port.
Connect the other end of the cable to the LAN-facing switch.
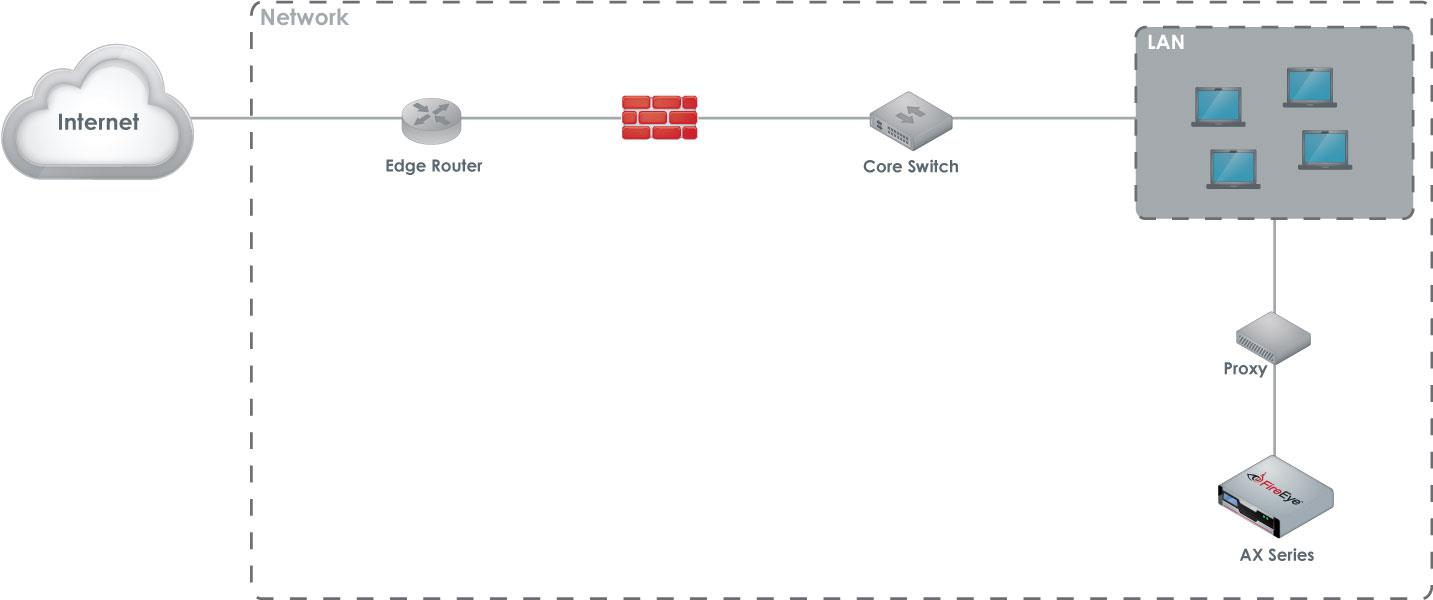
Sandbox Analysis with Proxy Deployment
To install the AX 5550 in a network that requires a proxy for all HTTPS requests, connect it to the LAN-facing proxy within your network, as shown in the following diagram.
10
© 2019 FireEye
Live Analysis Deployment
Prerequisites
Before connecting the AX 5550 to your network, ensure that your proxy provides
10/100/1000BASE-T Ethernet output.
Cabling
To connect your AX 5550 to your proxy:
Connect one end of an Ethernet cable to the ether1 port.
Connect the other end of the cable to the LAN-facing proxy.
Live Analysis Deployment
If you are unable to dedicate an isolated Internet connection to the AX 5550, you can use the same connection as your LAN, but your LAN’s information is not as secure. The following figure depicts how to install your AX 5550 without a dedicated Internet connection.
When your AX 5550 is installed according to this deployment, sandbox malware analysis is enabled and available as well. See “Malware Analysis” in the AX Series Threat Management Guide or AX Series System Administration Guide of your software release for more information.
© 2019 FireEye
11
AX Series Hardware Administration Guide
CHAPTER 2: Deployment
Prerequisites
Before connecting the AX 5550 to your network, ensure that your firewall and LAN-facing switch provide 10/100/1000BASE-T Ethernet output.
Cabling
Connect two Ethernet cables to the AX 5550 appliance’s management ports as follows:
ether1: Connect one end of the cable to the AX 5550 appliance’s ether1 port, and connect the other end to your LAN-facing switch.
ether2: Connect one end of the cable to the AX 5550 appliance’s ether2 port, and connect the other end to the Internet-facing switch.
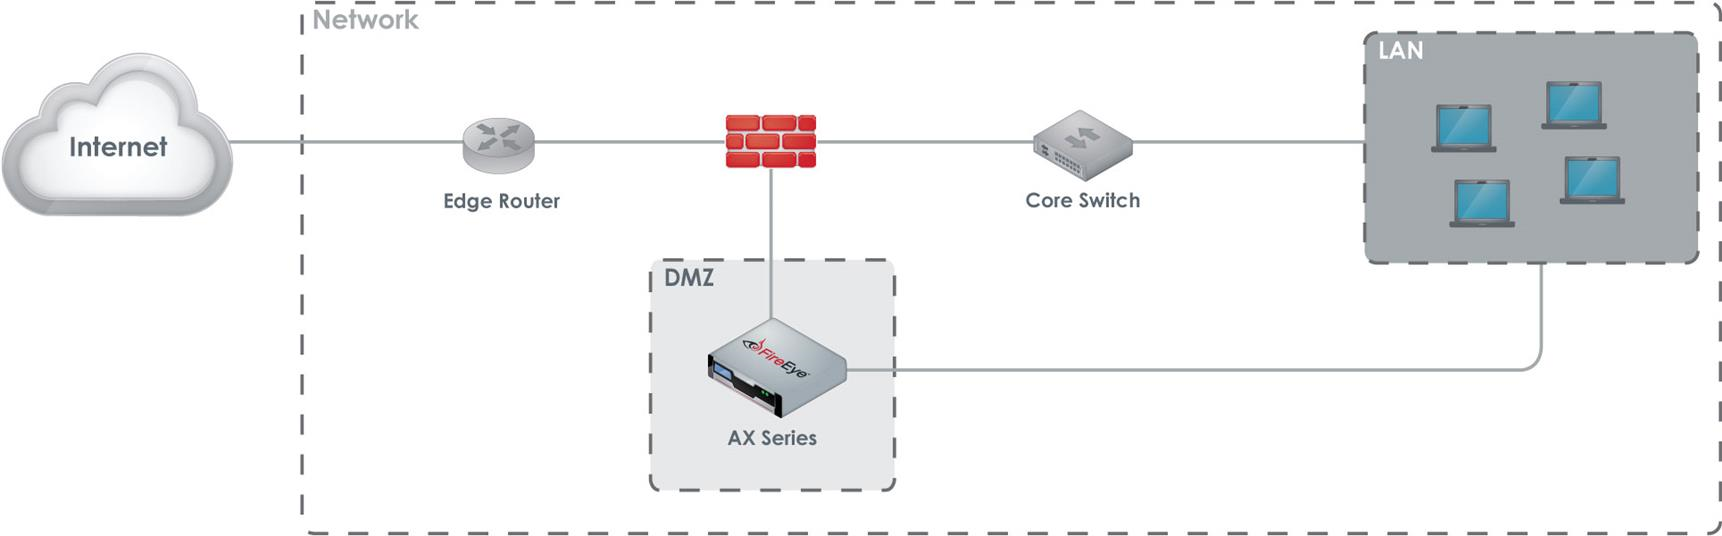
Live Analysis Deployment with
Dedicated Internet Link
FireEye recommends installing your AX 5550 within a demilitarized zone (DMZ) that has its own secure Internet connection, as shown in the diagram below. The AX 5550’s discrete Internet connection allows malware contained within the appliance to perform malicious activities, such as making callbacks to live CnC servers, without exposing the IP address and other information about your main network.
12
© 2019 FireEye
Live Analysis Deployment with Dedicated Internet Link
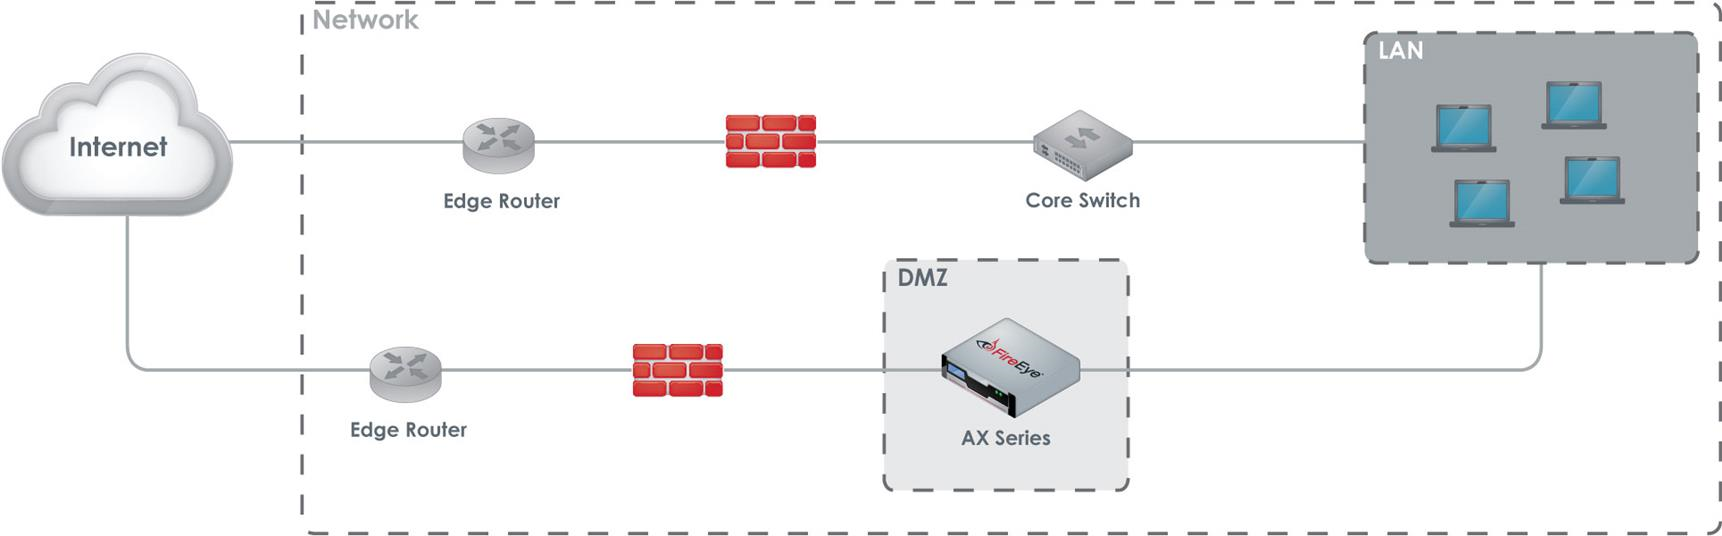
When your AX 5550 is installed according to this deployment, sandbox malware analysis is enabled and available as well. See “Malware Analysis” in the AX Series Threat Management Guide or AX Series System Administration Guide of your software release for more information.
Prerequisites
Before connecting the AX 5550 to your network, ensure that your firewall and LAN-facing switch provide 10/100/1000BASE_T Ethernet output.
Cabling
Connect two Ethernet cables to the AX 5550 appliance’s management ports as follows:
ether1: Connect one end of the cable to the AX 5550 appliance’s ether1 port, and connect the other end to your LAN-facing switch.
ether2: Connect one end of the cable to the AX 5550 appliance’s ether2 port, and connect the other end to your firewall device.
© 2019 FireEye
13
AX Series Hardware Administration Guide
CHAPTER 2: Deployment
14
© 2019 FireEye
AX Series Hardware Administration Guide
Before You Begin
CHAPTER 3: Installation
This chapter provides information about the site requirements of your installation location.
Before You Begin
Follow the steps in this section before you install the appliance.
Before Opening the Box
Review the Packing Slip contained in the plastic slip attached to the top of the box.
Ensure the shipment contains the correct appliance.Ensure the serial number listed on the Packing Slip matches the one specified on the sticker located on one side of the box.
If there appears to be damage to the box, file a damage claim with the carrier who delivered it.
Unpacking the Appliance
Carefully remove the appliance from the box in an area away from heat, electrical noise, and electromagnetic fields.
Ensure your box contains:
The correct appliance model
An accessory kit
Online Documents Portal Referral
A rail kit
Installation Site Guidelines
Follow these guidelines when you select an installation site:
© 2019 FireEye
15
AX Series Hardware Administration Guide
CHAPTER 3: Installation
Leave enough clearance in front of the rack for its door to open completely without obstruction.
Avoid environments that produce heat, electrical noise, and electromagnetic fields.
Only install the appliance in a restricted access location such as a service closet or dedicated equipment room.
Make sure the location is properly ventilated.
Make sure there is sufficient space for air flow.
Rack Precautions
FireEye recommends that you mount the appliance in a standard 19-inch rack. The vertical hole spacing on the rack rails must meet standard ANSI/EIA-310-C requirements.
Consider the following before installing your appliance in the rack:
Ensure the leveling jacks on the bottom of the rack are fully extended to the floor with the full weight of the rack resting on them.
In a single-rack installation, stabilizers should be attached to the rack.
In a multiple-rack installation, the racks should be coupled together to increase their stability.
Always make sure the rack is stable before extending a component from the rack.
Only extend one component from the rack at a time—extending two or more simultaneously may cause the rack to become unstable.
Ensure your rack meets the safety requirements of UL 60950-1.
STABILITY HAZARD: The rack may tip over causing serious personal injury. To prevent injury:
Before extending the rack to the installation position, read the installation instructions.
Do not put any load on the slide-rail mounted equipment when the rails are extended in the installation position.
Do not leave the slide-rail mounted equipment with the rails extended in the installation position.
16
© 2019 FireEye
Server Precautions
Server Precautions
FireEye recommends reviewing the electrical and general safety precautions that came with each component you intend to install in the rack.
Review the following before installing the appliance in the rack:
Determine the placement of each component in the rack.
Ensure there is a minimum clearance of six inches behind the chassis to allow for easy cable management.
Install the heaviest component at the bottom of the rack first, then move up.
Allow hot-swappable power supply units, disk drives, and transceivers to cool before handling them.
Use a regulating uninterruptible power supply to protect your components from voltage spikes, power surges, and failure during a power outage.
Keep all of the rack's doors and panels closed when you are not servicing the components.
Rack-Mounting Precautions
Consider the following safety precautions when you install the appliance in the rack:
Make sure the appliance is grounded at all times to prevent damage from electrostatic discharge.
Use an electrostatic wrist guard when handling the appliance.
At least two technicians should be involved to install the appliance safely.
FireEye recommends only individuals with rack-mounting experience should install the appliance.
Install the appliance in an environment compatible with the manufacturer's maximum recommended ambient temperature (TMRA) for each component in your rack.
Power Requirements
The AX uses a 750 W power supply unit with an input rating of 100-240 VAC (±10%), 8-4.5 A at 50-60 Hz.
© 2019 FireEye
17
AX Series Hardware Administration Guide
CHAPTER 3: Installation
Ensure your power source has sufficient electrical overload protection. In North America, connect the rack to a power source with over-current protection that complies with UL 489. In Europe, the over-current protection must comply with IEC standards.
Ventilation Requirements
Ventilation and optimal location are essential to the proper operation of the AX Series appliance. Give the unit at least six inches of space around ventilation openings so that adequate ventilation is possible.
The AX Series appliance draws air through the front and expels it out the back. Note the direction of the air intake and exhaust of the other components in the rack to ensure safe ventilation of all components involved.
Cabling Requirements
The AX ships with the following cables:
(2) 6 ft AC power cord, SVT, 60°C, 3x18AWG (0.824mm²)
(1) 6 ft null modem DB9 female serial cable
You must provide any additional cables required to connect your system to the network and other devices. Do not exceed the maximum run length of the additional cables you provide.
Rack Installation
This section explains how to install your appliance in a standard 19-inch wide rack with the equipment provided. Because various rack units are available, the assembly procedure may differ slightly from the following instructions. Refer to the installation instructions that came with your rack.
Installing the Outer Rails on the Rack
Attach a short bracket to the front end of the right outer rail and a long bracket to the rear end of the right outer rail.
Adjust the length of the right outer rail to the size of the rack.
18
© 2019 FireEye
Attaching Cables to the Appliance
Attach the right outer rail to the right side of the rack using the screws provided.
Repeats steps 1-3 with the left outer rail.
Mounting the Appliance on the Rack
Align the rear of the inner rails installed on the appliance with the front channels of the outer rails installed on the rack.
Slide the appliance about halfway into the rack.
Press the rail-release notches down on both rails and slide the appliance fully into the rack.
(Optional) Further secure the appliance to the rack by inserting screws through the ears of the appliance and fastening them to the rack.
Attaching Cables to the Appliance
Connect the AX Series appliance to one or more network devices using the cables appropriate to the deployment of your choice.
Connect the power cable or cables to the power port or ports on the back of the appliance.
Turning On the Appliance
Power on the appliance by pressing the power button behind the bezel.
© 2019 FireEye
19
AX Series Hardware Administration Guide
CHAPTER 3: Installation
20
© 2019 FireEye
AX Series Hardware Administration Guide
Return Process
CHAPTER 4: Replacements
Return Process
If you believe you have a defective part or system, you must first contact FireEye Technical Support, who will validate the claim. If the part or system is defective, Technical Support will initiate a Return Materials Authorization (RMA) and guide you through the process. For more information, visit www.fireeye.com/legal.
Removing and Replacing a Disk Drive
Perform the following steps to remove and replace a disk drive:
Slide the bezel release tab to the right to unlatch it from the chassis.
Gently remove the bezel from the appliance to reveal the disk drives.
Locate the disk drive carrier that contains the failed disk drive.
Push the maroon button to release the latch handle.
Carefully pull the latch handle forward.
Pull the handle to slide the disk drive from its slot.
Slide the new drive into the empty slot. When the drive is fully inserted into the slot, push the latch handle in until it clicks.
Removing and Replacing a Power Supply Unit
Perform the following steps to remove and replace a power supply unit (PSU):
© 2019 FireEye
21
AX Series Hardware Administration Guide CHAPTER 4: Replacements
At the rear of the appliance, remove the power cable from the failed PSU.
Press the release lever toward the handle in a pinching gesture to unlatch the unit
and, while continuing to squeeze, pull out the PSU.Insert the replacement PSU in the slot and slide it in until it clicks into place.
22 © 2019 FireEye
AX Series Hardware Administration Guide
Appendix 1: System Specifications
Appendices
Appendix 1: System Specifications
The table below provides the technical specifications for the FireEye AX 5550.
Component | AX 5550 Specifications |
|---|---|
Form Factor | 1U Rack-Mount |
Weight of Appliance | 26.8 lbs (12.2 kg) |
Weight of Packaged Appliance | 37.8 lbs (17.2 kg) |
Dimensions | 17.2 x 25.6 x 1.7 inches |
Enclosure | 1 RU, fits 19-inch Rack |
Management Interfaces | (1) 10/100/1000BASE-T Ports |
Monitoring Interfaces | (1) 10/100/1000BASE-T Ports |
Memory | 64 GB (4 x 16 GB) |
Drive Capacity | (2) 4 TB HDD, |
AC Power Supply | Redundant (1+1), |
Maximum Power Consumption | 225 W |
© 2019 FireEye
23
AX Series Hardware Administration Guide
Appendices
Component | AX 5550 Specifications |
|---|---|
Operating Temperature | 10° to 35° C |
Maximum Thermal Dissipation | 768 BTU/hour |
24
© 2019 FireEye
Appendix 2: Product Compliance Information
Appendix 2: Product Compliance
Information
The following table lists the electromagnetic compatibility (EMC), low voltage directive (LVD), safety, and other regulatory standards met by the FireEye AX appliance.
EMC | LVD/Safety | Environment |
|---|---|---|
FCC Part 15 Class-A, CE (Class-A), CNS 13438, CISPR 32, VCCI V-3, EN 55024, EN 55032, EN 61000, ICES-003, KN 32, KN 35 | CSA 22.2, IEC 60950, EN 60950*, UL 60950 | RoHS REACH WEEE Conflict |
*All current amendments
© 2019 FireEye
25
AX Series Hardware Administration Guide
Appendices
26
© 2019 FireEye
Technical Support
For technical support, contact FireEye through the Support portal:
Documentation
Documentation for all FireEye products is available on the FireEye Documentation Portal
(login required):
© 2019 FireEye
27
FireEye, Inc. | 601 McCarthy Blvd. | Milpitas, CA | 1.408.321.6300 | 1.877.FIREEYE | www.fireeye.com
© 2019 FireEye, Inc. All rights reserved. FireEye is a registered trademark of FireEye, Inc. All other brands,
products, or service names are or may be trademarks or service marks of their respective owners.