|
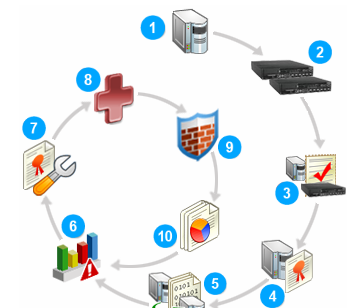
Step 1
|
Install the Manager software.
Install the Trellix Intrusion Prevention System Manager software on the server machine and ensure that you are able to log onto the Manager. For details, see Trellix Intrusion Prevention System Manager Installation Guide. |
|
Step 2
|
Set up and configure the Sensor(s).
Cable and install your Trellix Intrusion Prevention System Sensor(s) using a command line interface (CLI) and the Trellix IPS Manager. For details, see Trellix Intrusion Prevention System Manager Installation Guide. |
|
Step 3
|
Establish trust between the Manager and the Sensor(s).
The Trellix IPS Sensor initiates all communication with the Manager server until secure communication is established between them. Later, configuration information is pushed from the IPS Manager to the IPS Sensor.
|
|
Step 4
|
Configure policies in the Manager.
Determine the IPS policies applicable to your network. Use the Manager GUI to set up policies. By default, the provided Default policy is applied to all of your Sensor ports. You can choose a specific policy to apply by default to the Root Admin Domain (and thus all monitoring interfaces on the Sensor). For details, see Trellix IPS policies. |
|
Step 5
|
Configure the Update Server and download the latest signature sets.
For your Trellix IPS to properly detect and protect against malicious activity, the Manager and the Sensors must be frequently updated with the latest signatures and software patches available, which is made available to you via the Update Server. Authenticate your credentials with the Update server and download the latest signature set for your Trellix IPS deployment. For details, see Trellix IPS Protection Status. |
|
Step 6
|
View alerts.
The Attack Log page displays detected security events that violate your configured security policies. The page also provides powerful drill-down capabilities to enable you to see details on a particular alert like its type, source and destination addresses, and packet logs where applicable. View the alerts periodically and perform forensic analysis on the alert to help you tune Trellix IPS, and provide better responses to attacks. For details, see Attack Log. |
|
Step 7
|
Tune your
Trellix IPS deployment.
Once you have configured and started using Trellix IPS, you can further enhance your deployment using the Manager GUI by utilizing some of the more advanced features, such as changing your deployment mode, creating multiple admin domains, defining specific user roles, applying multiple policies to multiple domains, etc. For details, see Getting familiar with IPS Manager. |
|
Step 8
|
Check the system faults status.
The system faults monitor in the Manager details the functional status for all of your installed Trellix IPS system components. Check the faults at regular intervals to view messages that detail system faults experienced by your Manager, appliances, or database. For details, see Monitoring System Faults. |
|
Step 9
|
Block malicious or unwanted traffic.
Analyze the attacks that your network is receiving on a regular basis and take actions, which can range from analyzing the impact and modifying policies, or blocking specific traffic from transmitting through your system. For details, see Trellix IPS policies. |
|
Step 10
|
Generate Reports.
The Report Generator enables a user to generate reports for the security events detected by the system and reports on system configuration. Configure your report settings to generate reports manually or automatically, save them for viewing later, and/or email to specific individuals. For details, see Report Generation. |
.png)
.png)
.png)
.png)
.png)
.png)
.png)
.png)
.png)
.png)