Use the View and add HTTP Servers section on the HTTP tab of the Notification Settings page to add and configure HTTP servers.
Select Appliance Settings from the Admin menu.
Click Notifications on the side bar.
Click the HTTP link in the table header.
Locate the HTTP Server Listing section.
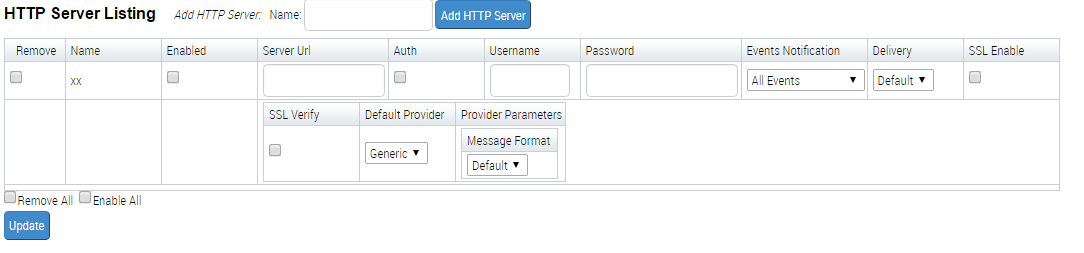
Enter the name of the HTTP server that will post the notification (for example, NX7400 or HX4500) in the Server name box.
Note
Do not enter URLs and email addresses in the Server name box.
Select the Enabled checkbox to choose which servers will post HTTP notifications.
In the Server URL field, enter the URL of the server to post the HTTP notification in the Server Url box.
(Optional) If authentication is required for the server, select the Auth checkbox. If you checked the Auth checkbox, you must also enter a username and password.
Enter the user name for HTTP authentication in the Username box.
Enter the password for HTTP authentication in the Password box.
Select the event type or All Events in the Events Notification drop-down list box to post HTTP notifications when the specified events are detected.
Note
Selections on the Summary tab take precedence over your selection here. For example, if you globally disable an event type on the Summary tab, no alert notifications will be sent for that event type, regardless of your selection in this drop-down list box.
Select the delivery frequency in the Delivery drop-down list box:
Per Event (recommended)—Send a notification each time an event of this type occurs.
Default—Use the delivery frequency specified in the Default delivery box in the HTTP Settings area.
Daily Digest—Send a daily notification of specified events detected in the past 24 hours in the selected format and level of details (default is Concise).
Default is automatically selected for the delivery frequency in the Default delivery drop-down list box. The delivery frequency specified in the Default delivery box in the Define protocol settings section will be used.
(Optional) If you want to use SSL for notifications, select the SSL Enable checkbox and SSL Verify checkboxes.
Select a service provider in the Default provider drop-down list box. The default service provider is Generic.
Note
Trellix recommends using the generic service provider. Endpoint Security servers do not support Aruba.
Default is selected as the notification format in the Message Format drop-down list box. The format specified in the Default format box in the Define protocol settings section will be used.
Click Update.
Note
If you do not click Update, your changes are lost.
Select Appliance Settings from the Admin menu.
Click Notifications on the side bar.
In the HTTP Server Listing section, locate the HTTP server listing you want to modify.
Update the settings as needed.
Click Update.
Note
If you do not click Update, your changes are lost.
Select Appliance Settings from the Admin menu.
Click Notifications on the side bar.
Click the HTTP link in the table header.
In the HTTP Server Listing section, locate the HTTP server you want to enable or disable.
Check the Enable checkbox to enable the server or uncheck the Enable checkbox to disable the server.
Click Update.
Note
If you do not click Update, your changes are lost.
Select Appliance Settings from the Admin menu.
Click Notifications on the side bar.
Click the HTTP link in the table header.
In the HTTP Server Listing section, locate the server listing you want to remove.
Check the Remove checkbox.
Click Update.
Note
If you do not click Update, your changes are lost.