You can add a new policy group from the Policy Group Details panel.
Task
- In the Policy tab, select <Admin Domain Name> → Intrusion Prevention → Objects → Policy Groups. The Policy Groups page is displayed.
-
Click
.png) in the
Policy Group page. The
Policy Group Details panel is displayed.
in the
Policy Group page. The
Policy Group Details panel is displayed.
Policy Group Details 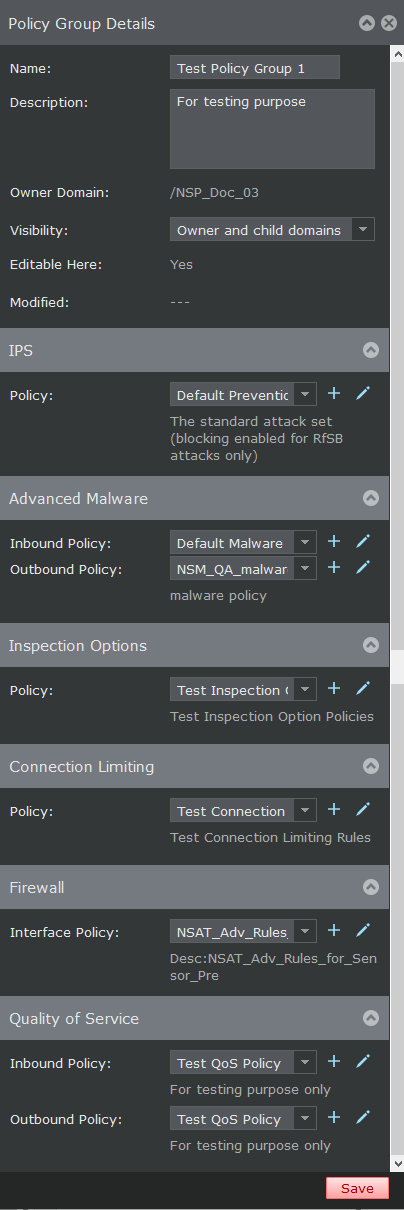
-
Update the following fields:
Option Definition Name Type the name of the policy group. Description Type the description of the policy group. Owner Domain Displays the admin domain to which the policy belongs. Visibility When selected, makes the policy available to the corresponding child admin domains. However, the policy cannot be edited or deleted from the child admin domains. From the drop-down list, select the option for the visibility level of the rule object.
Available options are Owner and child domains and Owner domain only.
Editable here The status Yes indicates that the policy is owned by the current admin domain. Modified Displays the user who last modified the policy along with the date and time. IPS: Policy Select the IPS policy from the drop-down list. The following are the available default IPS policies: - Default Exclude Informational
- Default DoS and Reconnaissance Only
- Default Prevention
- Default Testing
- Default Detection
Click
to add a new IPS policy.
Click
.png) to edit or view the selected IPS policy.
to edit or view the selected IPS policy.
Advanced Malware: Inbound Policy Select the inbound policy from the drop-down list. Click
to add a advanced malware policy.
Click
to edit or view the selected advanced malware policy.
Outbound Policy Select the outbound policy from the drop-down list. Click
to add a new advanced malware policy.
Click
to edit or view the selected advanced malware policy.
Inspection Options : Policy Select the Inspection Options policy from the drop-down list. The following are the available default inspection options policies: - Default Client Inspection — To inspect traffic from internal endpoints as they access the Internet.
- Default Server Inspection — To inspect traffic to exposed Web and mail servers.
- Default Client and Server Inspection — To inspect traffic both from internal endpoints and to exposed Web and mail servers.
Click
to add a new Inspection Options policy.
Click
to edit or view the selected Inspection Options policy.
Connection Limiting: Policy Select the Connection Limiting policy from the drop-down list. Click
to add a new Connection Limiting policy.
Click
to edit or view the selected Connection Limiting policy.
Firewall: Interface Policy Select the Firewall interface policy from the drop-down list. Click
to add a new Firewall policy.
Click
to edit or view the selected Firewall policy.
Quality of Service: Inbound Policy Select the QoS inbound policy from the drop-down list. Click
to add a new QoS inbound policy.
Click
to edit or view the selected QoS inbound policy.
Outbound Policy Select the QoS outbound policy from the drop-down list. Click
to add a new QoS outbound policy.
Click
to edit or view the selected QoS outbound policy.
- Click Save to save the policy group.