Use this file to discover all available pages before exploring further.
The new docs.trellix.com features a modernized UI and AI-powered conversational search. Content is currently available in English, with additional languages launching in early November 2026. We hope you enjoy the updated experience.
To create an External Controller in AWS, you require any one of the following information:
Information about the region of your cloud environment
The Access and Shared keys generated when your AWS account was created
Manager Instance assigned to the IAM Role with necessary policies configured. If the Manager is installed in the AWS environment, IAM Role is used to authenticate the cloud access account details. The local Controller requires the IAM Role to access the cloud.
To set up communication between the Manager and the Controller server you have to configure the
Controllers in the Manager. You can either use the Local Controller that is bundled with the Manager or you can deploy an External Controller instance in the AWS environment.
Task
In the Manager, go to
Devices → <Admin Domain Name> → Global → Device Manager. The
Device Manager page is displayed.
Select the
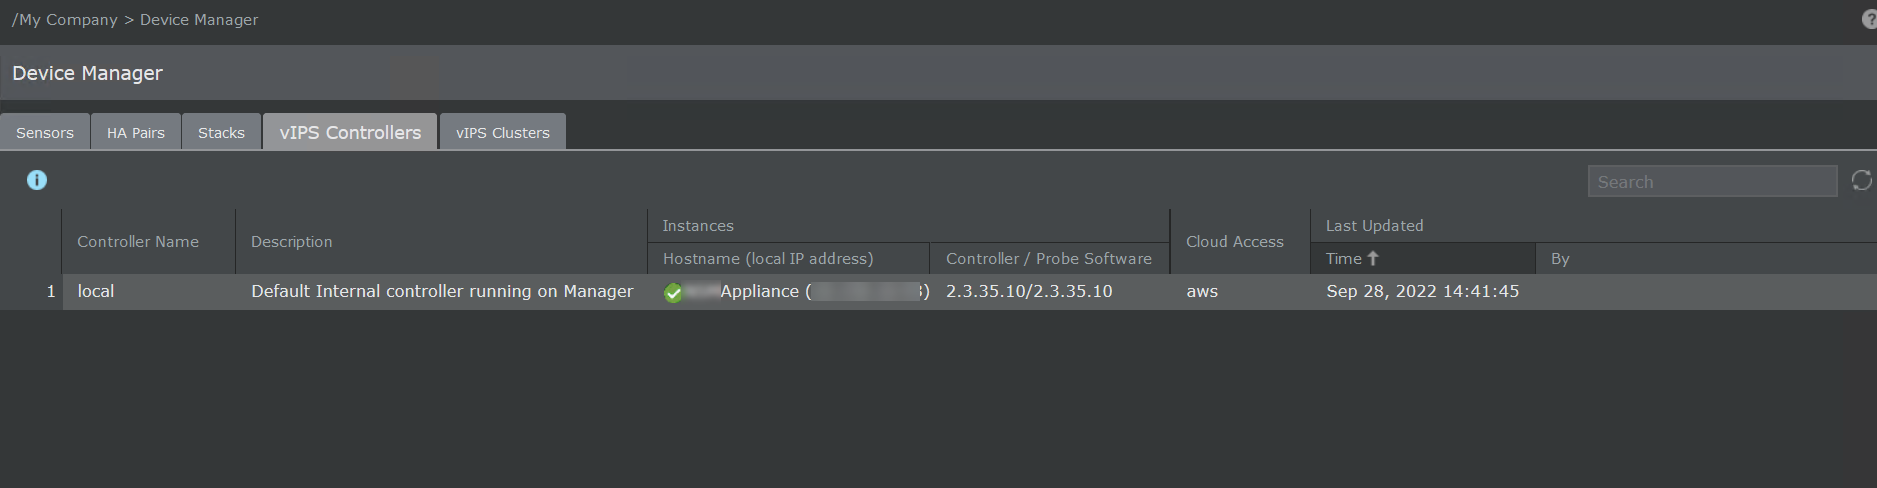
vIPS Controllers tab.
On the
vIPS Controllers tab, all configured Controllers details are displayed.
Column
Definition
Controller Name
Displays the name of the Controller
- This icon is displayed if the cloud details are not configured for the Local Controller. You need to enter Cloud account to make Controller configuration complete. In case the cloud account is incomplete, the invalid icon will be always displayed.
Description
Displays additional information for the Controller
Instances
Hostname (local IP address)
Displays the name or the IP address of the Controller Server. The icon before the Controller IP address displays the status of the Controller. The status can be one of the following:
Online
Disconnected
Controller/Probe Software
Displays the software version of the Controller and the
vIPS Probe
Cloud Access
Displays the name of the cloud service provider
Last Updated
Time
Displays the time when the Controller was last updated
By
Displays the user who modified the Controller
Refresh the status of all the Controllers.
Search
Enter the keyword to search the required Controller.
Create a new
vIPS External Controller.
Deletes a Controller
Save as CSV
Creates a .csv list of the list of Controllers
Other Actions
Download Controller Logs
Downloads the logs for the Controller
The Controller logs are downloaded in the form of a zip file.
View VMs
To view the VMs managed by the Controller.
Configure a public Manager name or IP
Assigns a public IP address or a domain name for the Manager
Enable the
Use a Public Manager Name or IP in the
Public Manager Name or IP dialog box.
Enter the public IP address or a domain name in the
Public Manager Name or IP text box and click
Save.
<Number> Controllers
Displays the total number of Controllers available in the Manager
Note
For AWS, the elastic IP address assigned to the Controller is displayed. If an elastic IP address is not assigned in case of a standalone Controller, the private IP address of the Controller is displayed.
vIPS Controllers
(Optional) To create a new External Controller, click
.
The
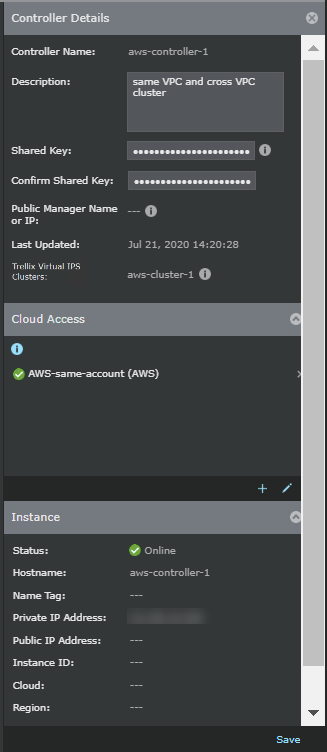
Controller Details panel appears where you can provide credentials for the cloud environment, the IP address, and the corresponding subnet details of the Controller.
Enter the required details:
Option definitions
Option
Definition
Controller Name
Enter a unique name for the Controller.
Note
This is field is editable only for External Controller.
Note
The minimum length for name is 1 character. The name can contain up to 50 alphanumeric (upper or lower case letters) characters, including hyphens and underscores. The name must begin with a letter.
Description
Enter the description for the Controller.
Note
This is field is editable only for External Controller.
Note
The minimum length for description is 1 character. The maximum allowed character length is 150 characters.
Shared Key
Enter a secret key for the Controller.
Note
This is field is available only for External Controller.
Confirm Shared Key
Re-enter the secret key for the Controller.
Note
This is field is available only for External Controller.
Public Manager Name or IP
Public IP address or the domain name of the Manager. To assign a public IP address or a domain name for the Manager, click
Other Actions → Configure Manager's Public IP Address, select
Use a Public Manager Name or IP. Enter the public IP address or the domain name of the Manager in the
Public Manager Name or IP text box and click
Save.
Last Updated
It is blank when creating the Controller for the first time. For an existing Controller, it displays the date, time, and user who last updated the Controller settings.
Trellix Vitual IPS Clusters
It is blank when creating the Controller for the first time. For an existing Controller, it displays the list of Clusters assigned to this Controller.
Cloud Access
Add a Cloud account. The Manager uses the following methods to access a Cloud account:
Access Key: Access Key and Shared key is used to access the AWS account. Use this method if you are running the controller in another cloud environment and not in the AWS environment.
IAM Role: IAM role associated with the Controller is used to access the instance.
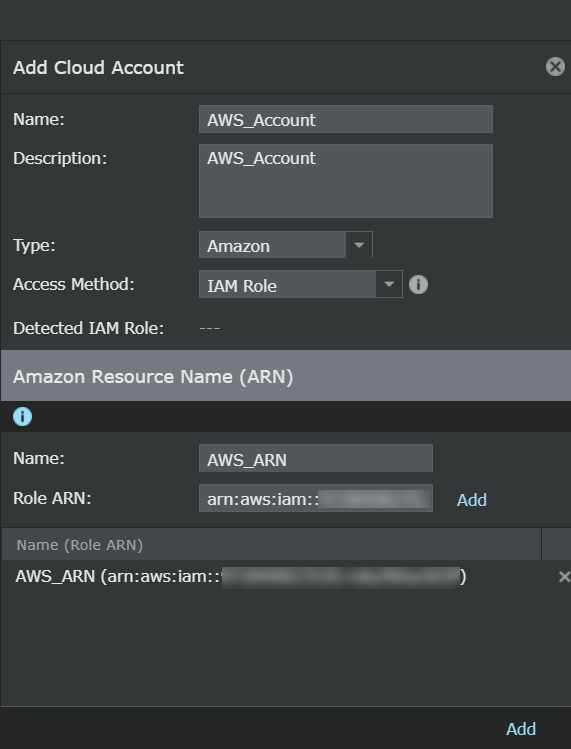
Once the Cloud account details are configured, add the Amazon Resource Name (ARN). This is required if cross-account access is required for the Controller.
By using the Cloud account credentials, Manager discovers and lists all the instances available in the VPC of the Cloud account. You can view the list of instances at
Analysis → <Admin Domain Name> → Virtual Machines.
Edit a Cloud account.
You can also add multiple AWS accounts by clicking
and adding additional ARN details.
Instance
Note
Only after the Controller establishes trust with the Manager, the below values be populated.
Status
The icon displays the status of the Instance. The status can be one of the following:
Online
Disconnected
Hostname
Displays the name of the Controller.
Name Tag
Displays the tag of the Controller.
Private IP Address
Displays the private IP address of the Controller.
Public IP Address
Displays the public IP address of the Controller.
Instance ID
Displays the ID of the Controller.
Cloud
Displays the Virtual Cloud network details of the Controller.
Region
Displays the Region of the Controller.
Controller Software
Displays the Controller software version.
Probe Software
Displays the vIPS Probe software version.
Save
Click to save the settings.
Controller details panel for AWS If you have selected
Amazon as the
Cloud Environment, the following details are displayed:
Option
Definition
Cloud Environnment
Amazon
Region
Select the name of the region in which your Controller resides.
Access Method
Select one of the methods given below to access the AWS environment:
Access Key: Access Key and Shared key is used to access the AWS account.
Enter the following details:
Access Key — Enter the Access Key for API access of your AWS account. This key should allow minimum AmazonEC2ReadOnlyAccess.
Secret Key — Enter the Secret Key associated with the Access Key.
Detected IAM Role — Displays the IAM role associated with the Manager
Amazon Resource Name (ARN)
Note
The fields for ARN are optional. These fields are used only when you wish to configure cross account access.
Name
Enter the name associated with the ARN.
Role ARN
Enter the ARN value associated with the role to access the AWS environment.
Save
Click to save the settings.
Controller details panel for AWS
To configure multiple AWS account complete the following steps:
Create the IAM role to attach the Manager.
Create and Inline Policy for the IAM role as given below.
For multiple AWS account, you need to create a role in the second account and create a policy in the first account user/role so that the user/role can assume the user/role in the second account. In the main AWS account, configure the below policy to the account.
multiaccount__account1assumePolicy (Custom/Inline Policy – to assume role in second account)
{
"Version": "2012-10-17",
"Statement": [
{
"Action": "sts:AssumeRole",
"Resource": "arn:aws:iam::xxxxxxxxxxxxx:role/account2role2020-08-01_11-31-13-367",
"Effect": "Allow"
}
]
}
[/task/taskbody/steps/step/substeps/substep/info/table/tgroup/tbody/row/entry
{"col1"}) Resource (entry][/task/taskbody/steps/step/substeps/substep/info/table/tgroup/tbody/row/entry
{"col2"}) The ARN value for the user.
(entry]
Option
Definition
Action
The action that the user can perform in other account.
Effect
The effect for the action for the user.
For cross account access in the second AWS account, enter the ARN of user/role in the first account in the
Trust relationship.
If you are using the user access, Add the user ARN like given below:
To view the details for a Controller, double-click the Controller. The
Controller Details panel opens. It displays the Controller and Probe version installed along with the date, time and the user who last modified it.
To edit a Controller, double-click the Controller and edit the required details in the
Controller panel and click
Save.
Note
You can edit only the
Shared Secret,
Confirm Shared Secret,
Comment,
Access Key, and
Shared Key fields. To change the
Hostname (local IP address), you must recreate the Controller.
Note
If you edit the
Shared Secret for a Controller launched in AWS environment, you have to stop the Controller instance in the AWS environment and update the
User data to reflect the updated
Shared Secret key.
 - This icon is displayed if the cloud details are not configured for the Local Controller. You need to enter Cloud account to make Controller configuration complete. In case the cloud account is incomplete, the invalid icon will be always displayed.
 Online
 Disconnected


.png)