Before you begin
If the Manager is not integrated with Trellix GTI Lookup, you can see the following message: Please enable sending of Alert Data Details on the Participation page to make integration with GTI Lookup available. Select Integration → Global Threat Intelligence to enable the integration.
If you configure Endpoint Reputation at an admin domain, you can inherit these settings for the interfaces of the Sensors in this domain. You can also customize these settings for specific interfaces.
Task
-
In the Manager, go to
Policy → <Admin_Domain_Name> → Intrusion Prevention → Policy Types → Inspection Options.
The Inspection Options page is displayed.
.png)
-
Double-click a policy for which you want to configure Endpoint Reputation.
To add a new policy, click
.png) . Using either action, a page with the policy details appears with the
Properties tab selected.
. Using either action, a page with the policy details appears with the
Properties tab selected.
-
Update the following fields as applicable:
Option Definition Name Enter a unique name to easily identify the policy. Description Optionally describe the policy for other users to identify its purpose. Owner Domain Displays the admin domain to which the policy belongs Visibility When selected, makes the policy available to the corresponding child admin domains. However, the policy cannot be edited or deleted from the child admin domains. From the drop-down list, select the option for the visibility level of the rule object.
Available options are Owner and child domains and Owner domain only.
Editable here The status Yes indicates that the policy is owned by the current admin domain. This field is uneditable. Statistics Lasted Updated Displays the time stamp when the policy was last modified. This field is uneditable. Last Updated By Displays the user who last modified the policy. This field is uneditable. Assignments Indicates the number of inline ports to which the policy is assigned Prompt for assignment after save If you deselect this option you can save the policy now and assign it to the Sensor resources as explained in the following section. If you select this option, the Assignments window opens automatically when you save the policy and you can assign the policy to the required Sensor resources. Cancel Reverts to the last saved configuration -
Click
Next.
The screen shifts to the Inspection Options tab. By default, the Traffic Inspection tab is selected.
-
Click the
GTI Reputation Services tab. Endpoint Reputation Analysis is used to influence SmartBlocking decisions, create connection limiting rules, or to take action when a connection to or from a high-risk endpoint is seen on your network.
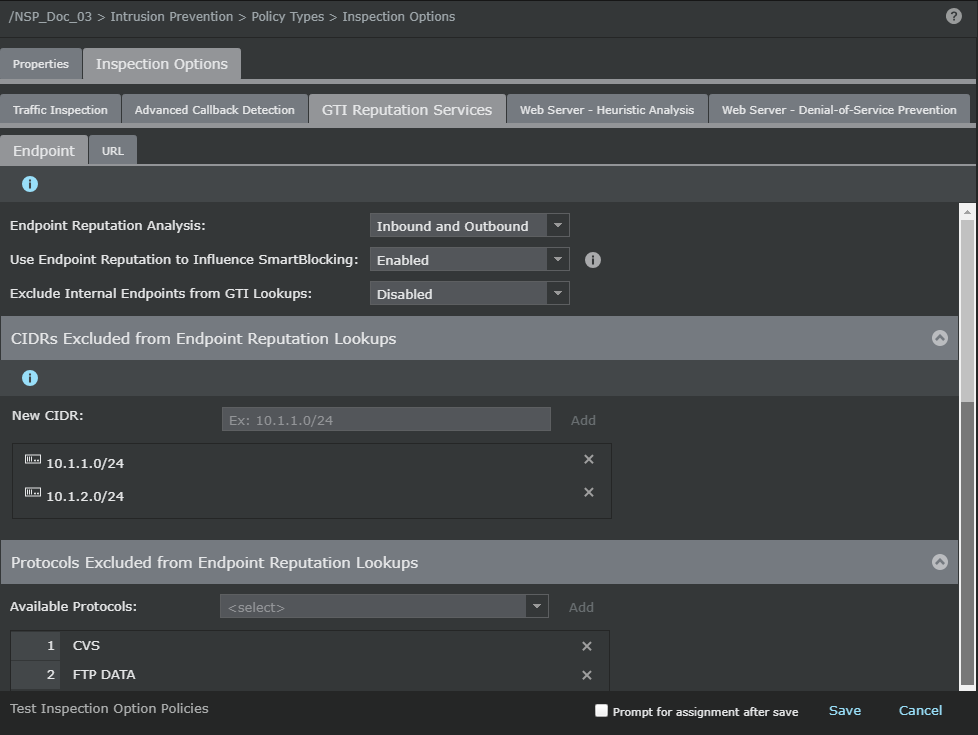
On the Endpoint tab, configure the following fields:
Option Definition Endpoint Reputation Analysis Select any of the following options: - Disabled
- Inbound only
- Outbound only
- Inbound and Outbound
Use Endpoint Reputation to Influence SmartBlocking Select Enabled to enable endpoint reputation to Influence SmartBlocking. Select Disabled to disable the option. Exclude Internal Endpoints from GTI Lookups Select Enabled to exclude internal endpoints from Trellix GTI Lookups. Select Disabled to disable the option. CIDRs Excluded from Endpoint Reputation Lookups New CIDR Enter the new CIDR and click Add to add to the CIDR list to be excluded. Click
 to remove the CIDR from the list.
Note
The CIDR exclusion list is shared by Advanced Callback Detection and Endpoint Reputation Analysis .
Protocols Excluded from Endpoint Reputation Lookups In the drop-down list, select the protocol to be excluded from Trellix GTI Lookups and click Add. The selected protocol is displayed in the field below. Click
to remove the protocol from the list.
Prompt for assignment after save When selected, you are automatically prompted to select the Sensor resources to which you want to assign the policy.
-
Click
Save to confirm your settings.
Clicking Cancel reverts to the last saved configuration.