Before you begin
To protect VMs, each VM needs to be part of a protected VM group. The definition of the group contains the following:
- VM membership by subnets they belong to.
- Cluster that should inspect traffic from these VMs.
- Controller that orchestrates the connectivity between the VMs and Cluster members.
- Security policy that applies to these VMs.
Note
If a VM is not part of a protected group, the VM will remain in unprotected state.
To create a Protected Group, perform the following steps:
Task
- Login to the Trellix IPS Manager instance.
- Select Policy → <Admin Domain Name> → Intrusion Prevention → Policy Manager.
-
Select
vIPS Protected Groups tab.
.png)
Description of columns in the vIPS Protected Group tab.Option descriptions Option Description Protected Group - Name — Name of the Protected Group.
Note
The minimum length for name is 1 character. The name can contain up to 50 alphanumeric (upper or lower case letters) characters, including hyphens and underscores. The name must begin with a letter.
- Description — Description of the Protected Group.
Note
The minimum length for description is 1 character. The maximum allowed character length is 255 characters.
- Inspection Mode — Mode of inspection. Displays either IPS or IDS.
vIPS Cluster Cluster of instances for which the Protected Group applies. vIPS Controller Controller for the Protected Group. Individual Policy Assignments - IPS — Type of IPS policy applicable for the Protected Group.
- Advanced Malware — Malware policy applicable for the Protected Group.
- Inspection Options — Inspecting policy applicable for the Protected Group.
- Connection Limiting — Connection limiting policy applicable for the Protected Group.
- Firewall — Firewall policies applicable for the Protected Group.

Refresh the status of all the Protected Groups. Search Enter the keyword to search the required Protected Group. 
Create a new Protected Group. .png)
Deletes a Protected Group. Save as CSV Creates a .csv list of the list of Protected Groups. View VMs To view the VMs managed by the Protected Group. - Name — Name of the Protected Group.
-
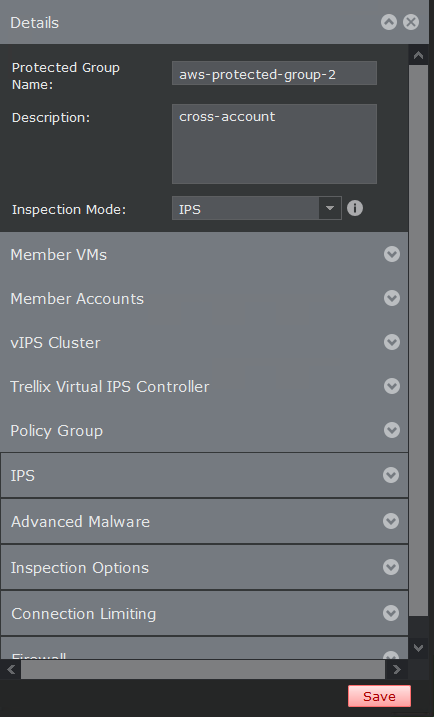
To add a Protected Group, click
. Enter the details for the Protected Group. in the
Details window.
Note
For each account you wish to secure, Trellix recommends you to create a separate protected group for different accounts. In the event of an attack, this will help in identifying the account that was attacked.
Option descriptions Option Description Details Details of the Protected Group. - Protected Group Name — Name of the Protected Group.
Note
The minimum length for name is 1 character. The name can contain up to 50 alphanumeric (upper or lower case letters) characters, including hyphens and underscores. The name must begin with a letter.
- Description — A brief description of the Protected Group.
Note
The minimum length for description is 1 character. The maximum allowed character length is 255 characters.
- Inspection Mode — Mode of inspection. You can select either IPS or IDS.
Member VMs Specifies the VMs for the Protected Group. Click Add to add the subnet CIDRs that you want to include in this Protected Group.
Member Accounts Specify the accounts to narrow down the selection of VMs. Leave blank to include VMs in all accounts accessible to the controller. vIPS Cluster Specify the Cluster for the Protected Group. To create a new Cluster or edit an existing Cluster, see Create a Cluster in the Manager for AWS.
Trellix Virtual IPS Controller Specify the Controller for the Protected Group. Click Add to add a Controller that you want to include in this Protected Group.
Policy Group Specify the Policy Group. IPS Specify the IPS policy for the Protected Group. Advanced Malware Specifies the Malware policy for the Protected Group. - Inbound Policy — Select the Malware policy for inbound traffic.
- Outbound Policy — Select the Malware policy for outbound traffic.
Inspection Options Specify the Inspection policy for the Protected Group. Connection Limiting Specify the Connection Limiting policy for the Protected Group. Firewall Specify the Firewall policy for the Protected Group. - Interface Policy — The type of firewall policy.
- Effective Rules —
- Click on Inbound to view the inbound rules for the selected interface policy.
- Click on Outbound to view the outbound rules for the selected interface policy.
Note
To create a new policy or to edit an existing policy, see Trellix Intrusion Prevention System Product Guide.
- Protected Group Name — Name of the Protected Group.
-
Click
Save.
On successful save, the Protected Group information is displayed in the vIPS Protected Groups tab.