Before you begin
For the sake of usability, an option is provided for you to create rule objects when creating the QoS rules. However, a systematic approach is to create the required rule objects and the Rate Limiting profile (if you plan to use rate limiting rules) before you create the QoS policy.
You create a QoS policy using the QoS rules as the building blocks. Then you need to assign the policy to the required Sensor ports.
Note
Import or export of QoS policies is not supported.
Task
- Click the Policy tab.
- From the Domain drop-down list, select the domain you want to work in.
-
Select
Intrusion Prevention → Policy Types → QoS.
The currently available QoS policies for the domain are listed. This includes the policies inherited from the parent domain. You cannot edit the inherited policies.
-
Click
.png) .
The QoS page displays.
.
The QoS page displays. -
Specify the details on the
Properties tab.
Properties option definitions Option Definition Name Enter a unique name to easily identify the policy. Description Optionally describe the policy for other users to identify its purpose. Owner Displays the admin domain to which the policy belongs Visibility When selected, makes the policy available to the corresponding child admin domains. However, the policy cannot be edited or deleted from the child admin domains. From the drop-down list, select the option for the visibility level of the rule object.
Available options are Owner and child domains and Owner domain only.
Editable here The status Yes indicates that the policy is owned by the current admin domain. Type Select the type — advanced or classic. After you save the properties, you cannot change the type. Statistics Lasted Updated Displays the time stamp when the policy was last modified Last Updated By Displays the user who last modified the policy Assignments Indicates the number of inline ports to which the policy is assigned Rate Limiting Rules Displays the number of Rate Limiting rules currently defined in the policy Diff Serv Tagging Rules Displays the number of DiffServ tagging rules currently defined in the policy 802.1P Tagging Rules Displays the number of 802.1P tagging rules currently defined in the policy Prompt for assignment after save When selected, you are automatically prompted to select the Sensor resources to which you want to assign the policy. Save Saves the changes made on the Properties tab. Note
This option is visible only when you open an existing policy.
Next Click this to save the changes made on the Properties tab and to access the Rate Limiting rules tabbed region. This button is available only when you create a policy. Important
After you click Next, you cannot change the policy type.
Cancel Reverts to the last saved configuration -
Define the QoS rules for rate limiting, Diff Serv, and 802.1P in the corresponding tabs.
You use the rule objects as building-blocks to create a rule. Recall that the Sensor matches the rules in a top-down fashion and does not processes a set of rules after the first match. So make sure the specific rules are defined at the top, and the rules with a broader scope are defined towards the end of the list.
-
On the
Rate Limiting Rules,
Diff Serv Rules, and
802.1P Rules tabs, click the appropriate button to insert a new rule.
QoS rule button definitions Option Definition 
Inserts a new rule above the currently selected rule 
Inserts a new rule below the currently selected rule 
Clones the currently selected rule 
Deletes the currently selected rule 
Moves the currently selected rule one row up 
Moves the currently selected rule one row down On the Diff Serv Rules tab, you can select any of the following options for Unclassified Traffic - Diff Serv Value :- Set to Zero — To re-tag the unclassified traffic with a zero-value tag
- Keep the value seen on the wire — To retain the tag that was originally present
On the 802.1P Rules tab, you can select any of the following options for Unclassified Traffic - 802.1P Value :- Set to Zero — To re-tag the unclassified traffic with a zero-value tag
- Keep the value seen on the wire — To retain the tag that was originally present
Note
To search for a specific rule, type the first few letters of the description of the rule in the Search field. The rule containing the description of the typed letter(s) is displayed.
-
Double-click on the row of an access rule and specify your choices.
The default Rate Limiting rule 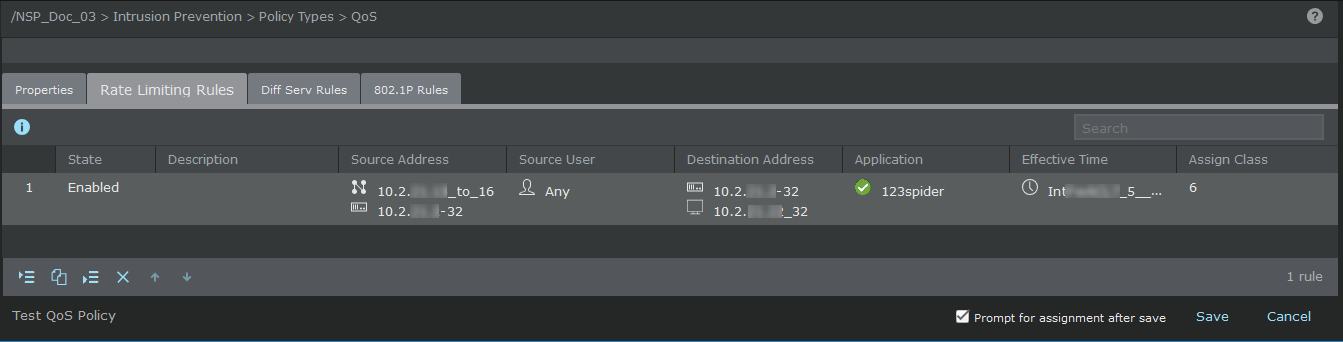
- For advanced QoS policies, change the values of
Source Address, Source User, Destination Address, Application, and
Effective Time and
Assign Class. For classic QoS policies, change
Service.
Note
In a Firewall access rule or QoS rule, you cannot specify an IPv4-based rule object for one field and IPv6-based rule objects for other applicable fields. For example, if you select an IPv6-based rule object in the Source Address field, then you cannot specify IPv4-based rule objects for Destination Address or Source User fields. You can specify only an IPv6-based rule object or any as the value for Destination Address and any for Source User. Recall that User and User Group rule objects are considered as IPv4 based rule objects because McAfee Logon Collector does not collect user information from IPv6 hosts. Similarly, Country and Host DNS Name are also IPv4-based rule objects.
- In the QoS rules, you can generally add up to 10 rule objects per field.
QoS rules option definitions Option Definition State Displays whether a rule is Enabled or Disabled. Sensor does not apply disabled rules. This option might help you during troubleshooting. Description Optionally enter additional information about the rule. You can enter a description up to 64 characters long and click OK. Source Address Select the rule objects corresponding to the source of the traffic from the Available list. Note
The Manager filters the rule objects containing more than 10 entries and lists only those which contain up to 10 entries, since the maximum supported rule object members per rule object in QoS policy is 10.
Click Add to add a rule object.
Click
to create a new rule object.
Click
.png) to edit or view a rule object.
to edit or view a rule object.
Click
.png) to remove the rule object from the list.
to remove the rule object from the list.
Source User Select the type of user from the Type drop-down list and then select the rule objects corresponding to the user from the Available list. Click Add to add the selected rule object.
Note
This option is for user-based rules. Recall that the Manager receives users and user groups from Logon Server and automatically displays them as rule objects. User groups are listed by default.
Destination Address Select the rule objects corresponding to the destination of the traffic from the Available list. Note
The Manager filters the rule objects containing more than 10 entries and lists only those which contain up to 10 entries, since the maximum supported rule object members per rule object in QoS policy is 10.
Click Add to add a rule object.
Click
to create a new rule object.
Click
to edit or view a rule object.
Click
to remove the rule object from the list.
Application Select the rule objects corresponding to the application from the Available list. Click Add to add a rule object.
Click
to create a new rule object.
Click
to edit or view a rule object.
Click
to remove the rule object from the list.
You can have Service or Application-related rule objects in a rule but not both.
Effective Time Select the time-based rule objects to specify the time when the Sensor should implement the rule, from the Available list. Click Add to add a rule object.
Click
to create a new rule object.
Click
to edit or view a rule object.
Click
to remove the rule object from the list.
Note
Time-based rules are implemented using the local time zone of the corresponding Sensor.
Assign Class Select the required class from the drop-down list. Recall that this class affects the bandwidth allotted for the traffic that matches the rule. Diff Serv Tag This option is seen when you select the Diff Serv Rules tab. Select the required DiffServ tag from the drop-down list and click OK.
802.1P Tag This option is seen when you select the 802.1P Rules tab. Select the required 802.1P tag from the drop-down list and click OK.
Prompt for assignment after save If you clear this option you can save the policy now and assign it to the Sensor resources as explained in the following section. If you select this option, the Assignments window opens automatically when you save the policy and you can assign the policy to the required Sensor resources. Save Saves the access rules in the Manager database. The QoS policy is listed in the Quality of Service (QoS) Policies list. Cancel Reverts to the last saved configuration You can follow these steps to clone and edit QoS policies.
- For advanced QoS policies, change the values of
Source Address, Source User, Destination Address, Application, and
Effective Time and
Assign Class. For classic QoS policies, change
Service.