You can configure the details for the integration at an admin domain so that the corresponding Sensors and child domains can inherit these settings. However, you must enable the integration at the Sensor level for the Sensor and the Manager to be able to communicate with Multi-Vector Virtual Execution (MVX) engine.
Task
- In the Manager, select the Devices tab.
- Select the domain from the Domain drop-down list.
- On the left pane, click the Devices tab.
- Select Setup → MVX Integration.
-
Enter the configuration details in the corresponding fields.
Enabling the integration for an admin domain 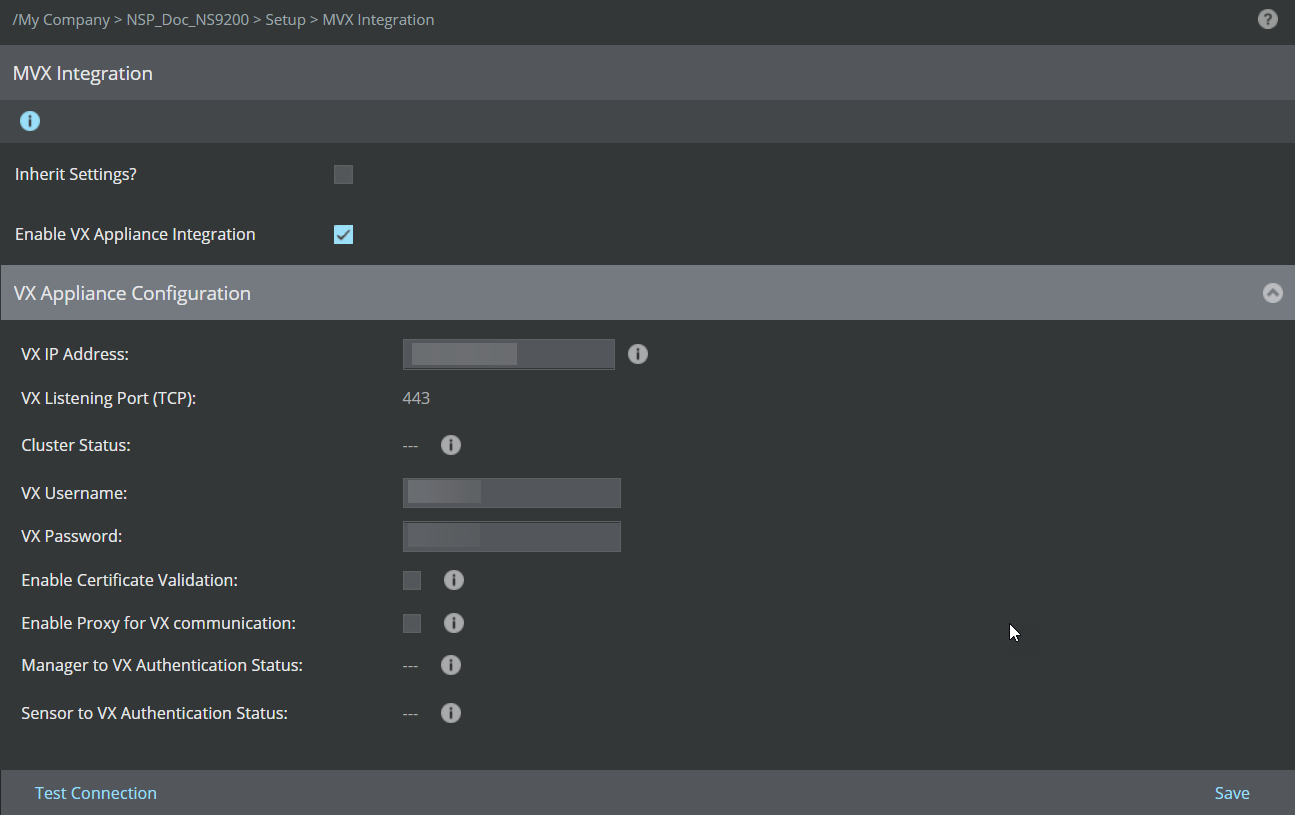
Option definitions Option Definition Inherit Settings? Select this option to inherit the integration configuration from the corresponding admin domain. The remaining fields are available only if this is de-selected. Enable VX Appliance Integration Select this option to integrate the Sensor with the VX appliance. After you select, you will be able to view and configure the details for the integration.
VX IP Address Enter the static IPv4 address of the VX broker for communicating with Sensor. VX Listening Port (TCP) This is the port that VX will listen for connections from Sensors. The default port is 443 and users cannot change it. Cluster Status Displays the status of the cluster that a VX node belongs to. .png) Ready: The cluster is ready and
Trellix IPS can connect to it based on the settings configured.
Ready: The cluster is ready and
Trellix IPS can connect to it based on the settings configured.
.jpg) Not Ready: User needs to recheck the VX appliance configuration. In such case, refer to the Virtual Execution Administration Guide.
Not Ready: User needs to recheck the VX appliance configuration. In such case, refer to the Virtual Execution Administration Guide.
- ---: Yet to be configured.
VX Username Enter the username of the VX appliance. VX Password Enter the password of the VX appliance. Enable Certificate Validation Select this option if you have configured CA signed certificate on the VX appliance. If the certificate is configured on the appliance, it is recommended to enable this option to ensure secure communication.
Enable Proxy for VX communication Select this option if you have deployed proxy server between the Sensor and the VX appliance. You need to configure proxy server at device level page and enable proxy option under the VX Appliance Configuration section.
Manager to VX Authentication Status Displays the authentication status of the Manager with the VX appliance. -
Successful: Manager to VX authentication is successful.
-
Unsuccessful: Manager to VX authentication failed. User needs to recheck the credentials entered.
- ---: Yet to be configured.
Sensor to VX Authentication Status Displays the authentication status of the Sensor with the VX appliance. -
Successful: Sensor to VX authentication is successful. User needs to recheck the credentials entered.
-
Unsuccessful: Sensor to VX authentication failed.
- ---: Yet to be configured.
Note
Upon configuration, it might take some time for the Sensor authentication status to update. You may refresh the page after 10 seconds to view the updated status.
Test connection Click to verify if the Manager and Sensor are able to communicate with the VX appliance using the details you configured. It is important that the fields Manager to VX Authentication Status and Sensor to VX Authentication Status display the status as
Successful. This ensures that the Sensors submit suspicious files for analysis, and the Manager retrieves the analysis result and display it in the user interface.
Save Saves the integration details in the Manager and Sensor database.