The diagram below illustrates the deployment of an NX 4600 appliance installed between the LAN and the firewall in a typical network topology.
Note
If your environment contains Web proxies or other NAT devices that obscure incoming IP addresses, deploy the NX device so that it sees Web traffic from the internal (or LAN) side of the proxy. If you place the NX device on the external side of the proxy, the NX appliance reports a malicious site as being the LAN IP of the proxy.
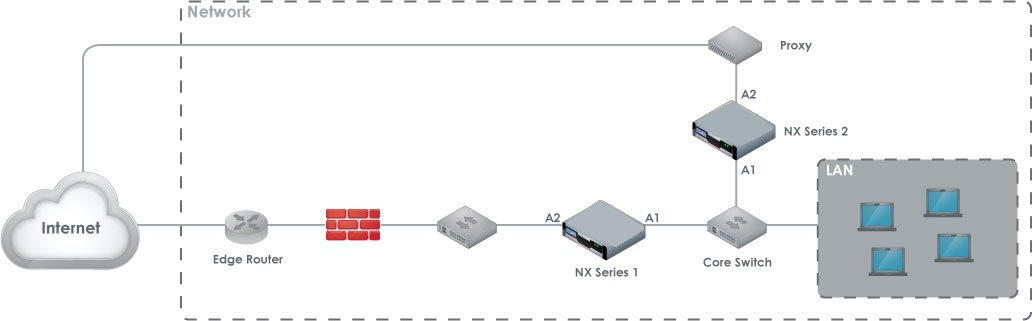
Connect your NX 4600 appliance between two routers or switches on your network, and to your proxy.
Prerequisites
Before connecting the NX 4600 appliance to your network:
Make sure that the connecting routers or switches do not provide data output greater than 1 Gbps for RJ45 ports and 10 Gbps for SFP+ ports.
Determine which ports on your routers or switches provide ingress and egress data
Cabling
Connect the appropriate cables to the NX 4600 appliance’s ports as follows:
ether1 cable: Connect one end of the cable to the NX 4600 appliance’s ether1 port, and connect the other end to your LAN-facing switch. This will enable you to access the appliance’s Web UI.
pether3 cable: Connect one end of the cable to the NX 4600 appliance’s pether3 port, and connect the other end to the LAN-facing switch.
pether4 cable: Connect one end of the cable to the NX 4600 appliance’s pether4 port, and connect the other end to the proxy server.
pether5 cable: Connect one end of the cable to the NX 4600 appliance’s pether5 port, and connect the other end to the LAN-facing switch.
You can monitor additional proxy servers by connecting additional proxies and LAN-facing switches to pether6—14.