To use the Rate Limiting technique for QoS, you need Rate Limiting profiles. You create the Rate Limiting profiles at the domain level. Then you assign one Rate Limiting profile for inbound and one for outbound of an inline port pair. You can also inherit the Rate Limiting profiles from a parent domain.
Creating a Rate Limiting profile involves distributing the throughput capacity of a monitoring port among 7 classes. Any unallocated bandwidth is automatically assigned to a hidden class 0. You cannot explicitly assign a bandwidth to class 0. The bandwidth of class 0 corresponds to the traffic that does not match any of the Rate Limiting rules.
Task
- Click the Policy tab.
- From the Domain drop-down list, select the domain you want to work in.
-
Select
Intrusion Prevention → Objects → Rate Limiting Profiles.
Option definitions - Rate Limiting Profiles page Option Definition .png)
Creates a Rate Limiting profile. .png)
Clones a Rate Limiting profile. Edit Double-click to view the details of a Rate Limiting profile or to edit a Rate Limiting profile belonging to the current admin domain. You cannot edit the inherited profiles. .png)
Deletes a Rate Limiting profile belonging to the current admin domain. Rate Limiting Profiles The currently available Rate Limiting profiles for the domain are listed. This includes the profiles inherited from the parent domain. Click a column heading to sort the table in ascending or descending order.
- Name — Indicates the name of the Rate Limiting profile.
- Owner — Indicates the admin domain to which a Rate Limiting profile belongs.
- Type — Indicates the Rate Limiting profile type.
- Last Modified — Indicates the details last modified.
- Last Modified By — Indicates by whom the details were modified.
- Assignments — Indicates the number of interfaces the policy is assigned to.
- Editable — A checkmark indicates that the Rate Limiting profile belongs to the current admin domain. If it is blank, you cannot edit the Rate Limiting profile because it is defined at a parent admin domain.
-
Click
The Rate Limiting Profiles configuration page displays.
-
Configure the Rate Limiting profiles by entering the required information in the relevant fields.
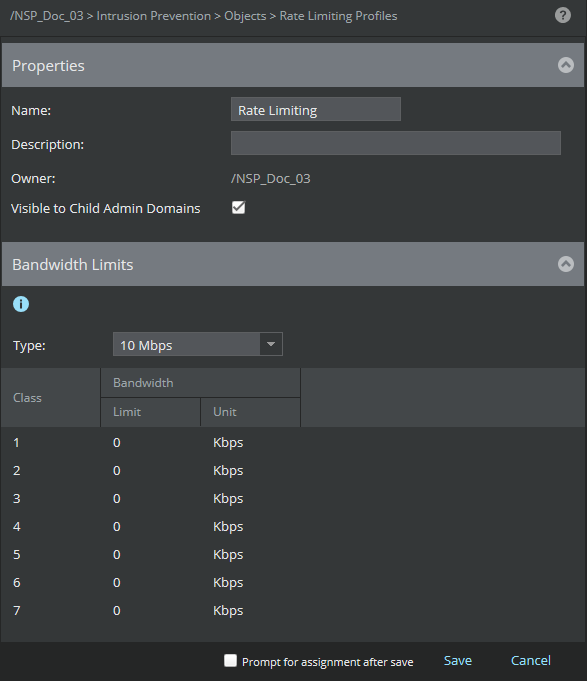
Option Definition Name Enter the name of the Rate Limiting profile. Description Optionally enter additional information about the Rate Limiting profile. Owner Indicates the admin domain to which the Rate Limiting profile belongs. This corresponds to the currently selected domain. Visible to Child Admin Domains When selected, makes the Rate Limiting profile is available to the corresponding child admin domains. You can assign the profiles to the resources of the child domains. However, the profile cannot be edited or deleted from the child admin domains. Bandwidth Limits Type This determines the bandwidth that is available for the classes of this Rate Limiting profile. This also determines the ports to which you can assign this Rate Limiting profile. For example, if the Type is 1 Gbps, then you can apply it only to ports whose speed is 1 Gbps or less. Class Lists the classes for which you can specify the Limit. Limit For the required Class, double-click in the corresponding Limit cell and enter a numerical value. Unit Double-click in the Units cell and select the unit of the bandwidth. Note
The total bandwidth allotted to the classes cannot exceed the value chosen for Type.
Prompt for assignment after save If you clear this option you can save the policy now and assign it to Sensor resources later. If you select this option, the Assignments window opens automatically when you save the policy and you can assign the policy to the required Sensor resources. Save Saves the Rate Limiting profile in the Manager database. Cancel Clears the entries you made in the Rate Limiting Profiles page. Following these steps, you can clone and edit Rate Limiting profiles.