The second essential step in Vulnerability Manager configuration is configuring the Vulnerability Manager database settings.
Using these settings, Manager connects to the Vulnerability Manager database to get relevance information, scan configuration details, scan engine details, and vulnerability data for scanned hosts. The required data is fetched directly from the Vulnerability Manager database using stored procedures specific to the Manager.
Tip
Make sure that you have enabled Vulnerability Manager integration before configuring Vulnerability Manager Database Settings.
Task
-
Select
Manager → <Admin Domain Name> → Integration → Vulnerability Assessment → MVM → Vulnerability Scanning → Database Settings.
Database sub-tab 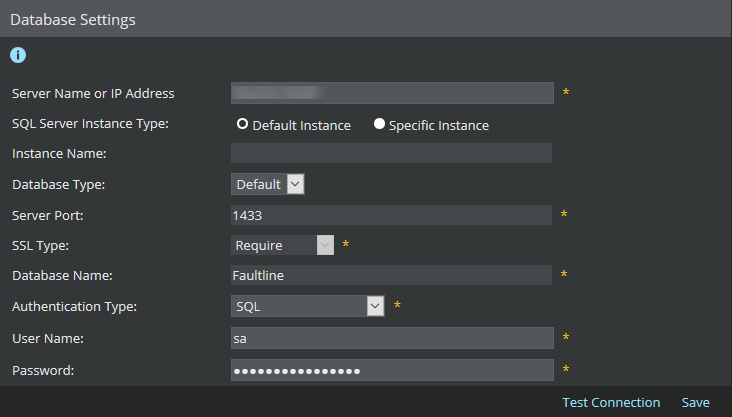
- In Database Settings window, enter Server Name or IP Address of the Vulnerability Manager database.
-
Select the
Database Type. You can choose
Default database or a
Custom database.
- When you choose
Database Type as
Default, note that
Database Settings window displays the following default values for three fields as given below:
- Server Port as 1433
- SSL Type as Require
- Database Name as Faultline
- When the Database Type is selected as Custom, you can enter custom values in Server Port, SSL Type and Database Name fields.
If you select the Default option, go to step 7. If you select Custom, proceed with the next step. - When you choose
Database Type as
Default, note that
Database Settings window displays the following default values for three fields as given below:
- Enter Server Port for the Vulnerability Manager database server.
-
Select
SSL Type.
SSL type Description Off SSL is not requested or used; this is the default. Request SSL is requested; if the server does not support it, a plain connection is used. Require SSL is requested; if the server does not support it, an exception is thrown. Authenticate Same as Require, except that the Vulnerability Manager server's certificate is signed by a trusted Certifying Authority (for example, VeriSign or DigiCert). - Enter the name of the Vulnerability Manager database server in Database Name.
-
Next, you can select three different authentication type for logging into Vulnerability Manager database –
SQL,
Windows Domain, or
Windows Workgroup.
In all these authentication types, User Name and Password refer to those of the Vulnerability Manager database server that is used in the configuration.
- In the case of SQL Authentication,
- Enter User Name.
- Enter Password.
- In the case of Windows Domain Authentication,
- Enter User Name.
- Enter Password.
- Enter
Logon Domain.
Note
Logon Domain represents the network domain for the Windows NT system. This field is exclusively for Windows Domain Authentication.
- In the case of Windows Workgroup,
- Enter User Name.
- Enter Password.
- Enter Server Name of the Windows Workgroup server.
- In the case of SQL Authentication,
-
Click
Test Connection to check the availability of Vulnerability Manager database connection. The success or failure in connectivity is displayed as a message in the
Database Settings page.
Note
The logon credentials (username and password) for both type of authentications should be given db_owner access rights in the Vulnerability Manager database. This is essential for Manager to establish connection with Vulnerability Manager database, and automatically install stored procedures in the Vulnerability Manager database.
Note
Note that when Vulnerability Manager database settings are configured for the first time, Manager automatically installs the Vulnerability Manager database with required tables and stored procedures that are used for retrieving information.